
Sparkling Water Tutorials Updated

This is updated version of Sparkling Water tutorials originally published by Amy Wang here
For the newest examples, and updates, please visit Sparkling Water GitHub page
The blog post introduces 3 tutorials:
- Running Sparkling Water Locally
- Running Sparkling Water on Standalone Spark Cluster
- Running H2O Commands from Spark Shell
Note: If you are interested in running _Sparkling Water_ on the top of YARN, please, visit Tom’s blog post
Tutorial #1 – Running Sparkling Water Locally

In the first tutorial, we show running a Sparkling Water example on an embedded Spark cluster composed of three worker nodes.
The provided example performs the following actions:
- Start up a Spark Cluster
- Launch H2O in conjunction to the Spark Cluster
- Import and parse an airlines dataset
- Filter and munge using Spark to create a subset of the origin data
- Build a model using H2O
- Predict using the model built in H2O
Walkthrough
Step 1 – Prerequisites
- Linux or Mac OS
- Oracle’s Java 1.7
- Spark version will depend on your Sparkling Water Installation. Currently supported versions are Spark 1.2 and Spark 1.3 Please check the Sparkling Water download page for most recent supported versions
Step 2 – Download the Sparkling Water distribution zip file
Step 3 – Unzip the downloaded sparkling-water-1.3.6.zip file, export SPARK_HOME variable to point to your Spark 1.3.1 installation
$ unzip sparkling-water-1.3.6.zip
$ export SPARK_HOME='/path/to/spark1.3.1/installation'
$ cd sparkling-water-1.3.6
Point Spark MASTER variable to a Spark cluster – in this case local 3-nodes cluster
$ export MASTER=”local-cluster[3,2,1024]” # Point Spark MASTER variable to a Spark cluster – in this case local 3-nodes cluster
Step 4 – Run the example
To run default example, building model predicting flight delays, please invoke:
$ bin/run-example.sh
Note: If your machine detects multiple home addresses that H2O can launch on look for the IP address that H2O actually launches on
which can be found under _”Attempting to determine correct address”_. Cancel the operation and set Spark’s local IP address to where
H2O was launching on and execute the example script again.
“`
$ export SPARK_LOCAL_IP=’127.0.0.1′
$ bin/run-example.sh
“`
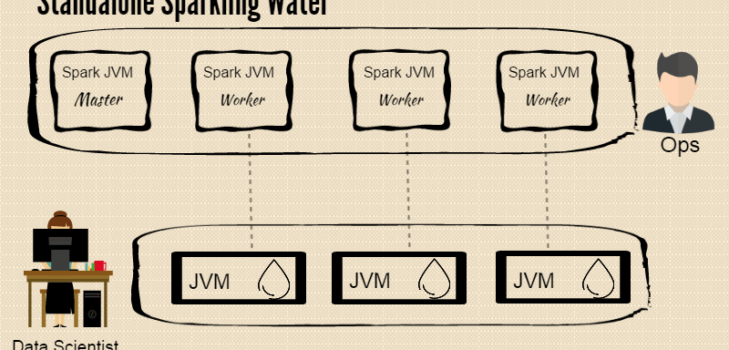
Tutorial #2 – Running Sparkling Water on Standalone Spark Cluster

Much like running Sparkling Water locally on embedded Spark cluster, we’ll start up a standalone Spark cluster composed of three workers and master nodes. The Sparkling Water example will be deployed and executed on this cluster.
Walkthrough
Step 1 – Prerequisites
- Linux or Mac OS
- Oracle’s Java 1.7
- Spark version will depend on your Sparkling Water Installation. Currently supported versions are Spark 1.2 and Spark 1.3 Please check the Sparkling Water download page for most recent supported versions
Step 3 – Unzip the demo.zip file and configure SPARK_HOME variable
$ unzip sparkling-water-1.3.6.zip
$ cd sparkling-water-1.3.6
$ export SPARK_HOME='/path/to/spark1.3.1/installation'
$ bin/launch-spark-cloud.sh
$ export MASTER="spark://localhost:7077"
Step 5 – Run the example scriptNote: You can access the Spark Cluster at `http://localhost:8080` and H2O on `http://localhost:54321`.
$ bin/run-example.sh
Tutorial #3 – Running H2O Commands from Spark’s Shell
For those adventurous enough to play with the source code, there is workflow available that will give the user more flexibility so that different datasets can be used and different algorithms can be tried.
In this tutorial we will use standalone Spark cluster and launch Sparkling Shell on the top of it.
Note: To use embedded Spark cluster for this example, please, export its configuration via `MASTER` environment variable, e.g.:
export MASTER="local-cluster[3,2,1024]"
Walkthrough
Step 1 – Prerequisites
- Linux or Mac OS
- Oracle’s Java 1.7
- Spark version will depend on your Sparkling Water Installation. Currently supported versions are Spark 1.2 and Spark 1.3 Please check the Sparkling Water download page for most recent supported versions
Step 3 – Unzip the file and launch a Spark Cluster (UI can be accessed at localhost:8080)
$ unzip sparkling-water-1.3.6.zip
$ cd sparkling-water-1.3.6
$ export SPARK_HOME='/path/to/spark1.3.1/installation'
$ bin/launch-spark-cloud.sh # Build a simple standalone Spark cluster
$ export MASTER="spark://localhost:7077" # Points to cluster location
Step 4 – Start the Spark ShellNote: If your machine detects multiple home addresses that H2O can launch on look for the IP address that H2O actually launches on
which can be found under “Attempting to determine correct address”. Set Spark’s Local IP address to where
H2O was launching on, for example:$ export SPARK_LOCAL_IP='127.0.0.1'
$ bin/sparkling-shell
Step 5 – Create H2O context based on existing Spark context and launch H2O (UI can be accessed at localhost:54321)scala
import org.apache.spark.h2o._
import org.apache.spark.examples.h2o._
val h2oContext = new H2OContext(sc).start()
import h2oContext._
scala
import java.io.File
val dataFile = "examples/smalldata/allyears2k_headers.csv.gz"
val airlinesData = new H2OFrame(new File(dataFile))
scala
val airlinesTable : RDD[Airlines] = asRDDAirlines
airlinesTable.count
scala
val flightsOnlyToSFO = airlinesTable.filter( _.Dest == Some("SFO") )
flightsOnlyToSFO.count
scala
import sqlContext.implicits._ // Import implicit conversions from provided SQLContext
airlinesTable.toDF.registerTempTable("airlinesTable")
val query = "SELECT * FROM airlinesTable WHERE Dest LIKE 'SFO'"
val result = sqlContext.sql(query) // Using a registered context and tables
result.count
// Make sure that results are correct (should return true)
result.count == flightsOnlyToSFO.count
import hex.deeplearning.
import hex.deeplearning.DeepLearningModel.DeepLearningParameters
val dlParams = new DeepLearningParameters()
dlParams._train = result( ‘Year, ‘Month, ‘DayofMonth, ‘DayOfWeek, ‘CRSDepTime, ‘CRSArrTime,’UniqueCarrier, ‘FlightNum, ‘TailNum, ‘CRSElapsedTime, ‘Origin, ‘Dest,’Distance, ‘IsDepDelayed)
dlParams._response_column = ‘IsDepDelayed
val dl = new DeepLearning(dlParams)
val dlModel = dl.trainModel.get
scala
val predictionH2OFrame = dlModel.score(result)('predict)
val predictionsFromModel = toRDDDoubleHolder.map ( _.result.getOrElse(Double.NaN) ).collect
Additional Information