This blog was originally posted here
I created this guide to help fellow newbies get their feet wet with H2O, an open-source predictive analytics platform that is fast, powerful, and easy to use. Using a combination of extraordinary math and high-performance parallel processing, H2O allows you to quickly create models for big data. The steps below show you how to download and start analyzing data at high speeds with H2O. After that it’s up to you.
What You’ll Learn
- How to download H2O (just updated to OS X El Capitan? Then Java too)
- How to use H2O with IPython Notebook & where to get demo scripts
- How to teach a computer to recognize handwritten digits with H2O
- Where to find documentation and community resources
A Delicious Drink of Water — Downloading H2O
(If you don’t feel like reading the long version below just go here )
I recommend downloading the latest release of H2O (which is ‘Bleeding Edge ’ as of this moment) because it has the most Python features, but you can also see the other releases here , as well as the software requirements. Okay, Let’s get started:
Do you have Java on your computer? No sure? Here’s how to check:
- Open your terminal and type in ‘java -version’:
MacBook-Pro:~ username$ java -version

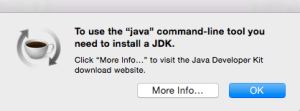
If you don’t have Java you can either click through the pop up dialogue box and make your way to the correct downloadable version, or you can go directly to the Java downloads page here (two-for-one tip: download the Java Development Kit and get the Java Runtime Environment with it).
Now that you have Java (fingers crossed), you can download H2O (I’m assuming you have Python, but if you don’t, consider downloading Anaconda which gives you access to amazing Python packages for data analysis and scientific computing).
You can find the official instructions to Download H2O’s ‘Bleeding Edge’ release here (click on the ‘Install in Python’ tab), or follow below:
- Prerequisite: Python 2.7
- Type the following in your terminal:
Fellow newbies don’t type in the ‘MacBook-Pro:~ username$’ part only type in what’s listed after the ‘$’: (you can get more command line help here ).
MacBook-Pro:~ username$ pip install requests
MacBook-Pro:~ username$ pip install tabulate
MacBook-Pro:~ username$ pip install scikit-learn
MacBook-Pro:~ username$ pip uninstall h2o
MacBook-Pro:~ username$ pip install http://h2o-release.s3.amazonaws.com/h2o/master/3250/Python/h2o-3.7.0.3250-py2.py3-none-any.whl
As shown above, if you installed an earlier version of H2O, uninstalling and reinstalling H2O with pip will do the trick.
Let’s Get Interactive — IPython Notebook
If don’t already have IPython Notebook, you can download it following these instructions . If you downloaded Anaconda, it comes with IPython Notebook so you’re set. And here’s a video tutorial on how to use IPython Notebook.
If everything goes as planned, to open IPython Notebook you ‘cd’ to your directory of choice (I chose my Desktop folder) and enter ‘ipython notebook’. (If you’re still new to the command line, learn more about using ‘cd’, which I like to use as a verb, here and here ).
MacBook-Pro:~ username$ cd Desktop
 MacBook-Pro:Desktop username$ ipython notebook
Random Note: After I updated to OS X El Capitan the command above didn’t work. For many people using ‘conda update conda’ and then ‘conda update ipython’ will solve the issue, but in my case I got an SSL error that wouldn’t let me ‘conda update’ anything. I found the solution here , using:
MacBook-Pro:~ username$ conda config — set ssl_verify False
 MacBook-Pro:~ username$ conda update requests openssl
 MacBook-Pro:~ username$ conda config — set ssl_verify True
Now that you have IPython Notebook, you can play around with some of H2O’s demo notebooks. If you’re new to Github, however, downloading the demos to your desktop can seem daunting, but don’t worry it’s easy. Here’s the trick:
- Navigate to H2O’s Python Demo Repository
- Click on your ‘.ipynb’ demo of choice (let’s do citi_bike_small.ipynb
- Click on ‘Raw’ in the upper right corner, then after the next web page opens, go to ‘File’ on the menu bar and select ‘Save Page As’ (or similar)
- Open your terminal, cd to the Downloads folder, or wherever you saved the IPython Notebook, then type ‘ipython notebook citi_bike_small.ipynb’
- Now you can go through the demo running each cell individually (click on the cell and press shift + enter)
Classifying Handwritten Digits — Enter a Kaggle Competition
A great way to get a feel for H2O is to test it out on a Kaggle data science competition. Don’t know what Kaggle is? Never enter a Kaggle Competition? That’s totally fine, I’ll give you a script to get your feet wet. If you’re still nervous here’s a great article about how to get started with Kaggle given your previous experience.
Are you excited? Get excited! You are going to teach your computer to recognize HANDWRITTEN DIGITS! (I feel like if you’re still ready at this point, it’s time to let my enthusiasm shine through).
- Take a look at Kaggle’s Digit Recognizer Competition
- Look at a demo notebook to get started
- Download the notebook by clicking on ‘Raw’ and then saving it
- Open up and run the notebook to generate a submission csv file
- Submit the file for your first submission to Kaggle, then play around with your model parameters and see if you can improve your Kaggle submission score
Getting Help — Resources & Documentation
- Python Demos
- Search Questions on H2O’s Google Group and Gitter
- Python Online Documentation
- Python Booklet with Example Code (click ‘Raw’ to download pdf)
- More Booklets for GLM, GBM & Deep Learning
- About H2O: Product Page, Wikipedia Page


