


Explore and learn from the first H2O Product Day event and discover more about all the latest & greatest innovations we’re making to our products and platforms.
Agenda:
H2O AI Cloud – 2:54
H2O AI Feature Store – 15:14
H2O Driverless AI – 32:20
H2O-3 – 40:25
H2O Hydrogen Torch – 54:51
H2O Document AI – 1:10:52
Model Validation – 1:28:36
H2O MLOps – 1:45:19
H2O Wave – 2:03:08
H2O AI AppStore – 2:24:22
H2O AutoDoc – 2:37:20
H2O Health – 2:45:03
H2O AI Feature Store Demo – 3:01:31
Read the Full Transcript
Welcome to the first H2O Product Day. This is our sprint release, the new series of events that you're launching, to pay for us to bring all the latest innovations that we are the company puts together all the time and take it to our customers, users and community. We are really, really happy that so many of you are going to be chatting today, and that you will be excited by all the innovations of the full lineup of products. But before we do that, for folks who might be coming in for the first time. Let me introduce ourselves. So H2O.AI is an AI first company, our mission is to democratize AI for everyone for 10 years now. And we built a whole suite of products to help data scientists, users, developers, engineers and businesses adopt and use AI to transform their business.
We're going to talk about a lot of these products today. But I want to sort of set the stage. We think of the entire AI journey for customers: going into adopting AI from scratch all the way to putting them on to production and getting value out of this. And to do that, think about tools that will help with what you make here, then the capabilities you need to operate that learning and AI model. And then innovate putting those to change using the models and your AI to change your physical and other products to even talk about today.
We'll go into the order that's already available for drivers, which a lot of human basic services integrate show open source, which is widely used by orders of longer, probably and I get a lot of new innovative products coming up as well to help you in your make journey they talk about or innovation in things like document data, which opens up a new kind of use cases to help again address the need for interfaces.
And finally, we'll cap it off with our offerings on the last which are helping to schedule models of production, or monitor them and retAIn them as needed.
And all of this is offered as part of the add on which is a one platform that brings together all these these ornaments right.
But with that I'm going to hand it over to Michelle Tanco to talk about our topic.
H2O AI Cloud
Hi everyone, my name is Michelle Tanco. I'm an H2O on the product team. And today we'll be talking to you about our end to end product and platform, H2O AI Cloud.
So what we're going to do today is first give a brief overview of what the Cloud is for anyone that is new to our MDM platform. And then we're gonna talk about what's been new and released in the Cloud the last three months, and some exciting features that we think you'll be interested to know about that's coming in the next three months.
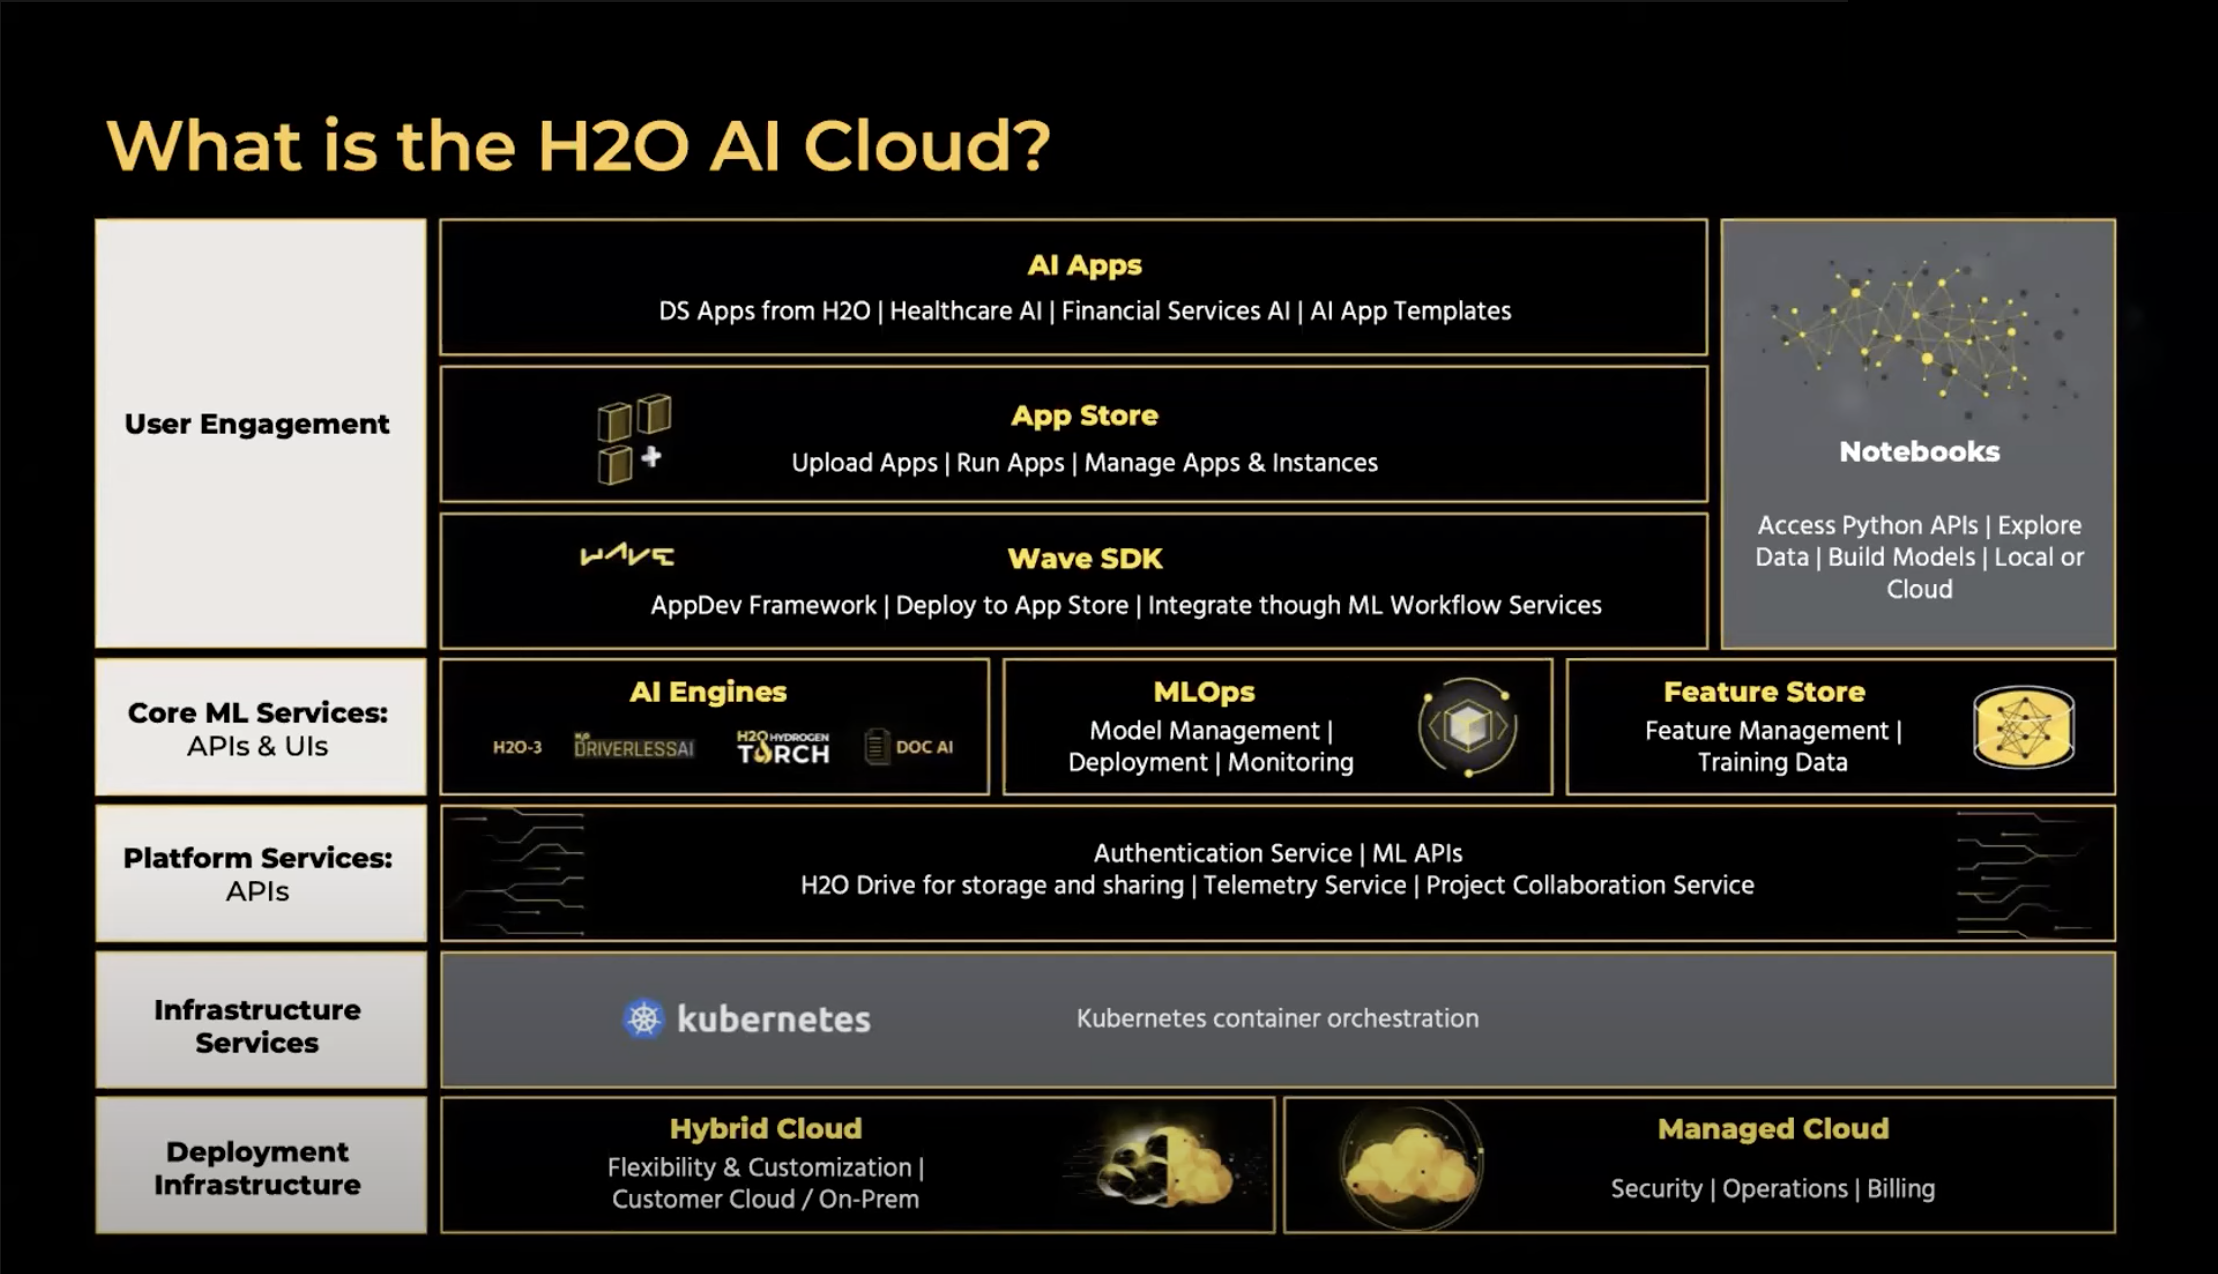
So what is the H2O AI Cloud? I'll just give you a brief overview of what it is. Our end to end platform allows different users in the AI journey to build models, deploy models, understand models, and then build applications for using these models in production. So you'll hear from many different product teams today, from our AI engineers who build your models to ML Ops teams or deploying them. But what I'm going to be focusing on in this first session is more on our platform services and the end to end glue and the end to end platform that allows you to get into the AI class.
The H2O AI Cloud product is available to customers in two main ways. The first is the Hybrid Cloud. So this is for our customers who have strong IT teams, really strong, specific details for security, and they want to have their platform in their own environment - this can be in your Cloud of choice. So in your own private VPC, AWS or Azure can also be prem on prem with anything where Kubernetes will run.
For other customers, the Managed Cloud might be a better solution. So this is ideal when you don't necessarily have an infrastructure or IP team to run your Kubernetes cluster. And you want H2O to handle all of this. So our Managed Cloud environment, it's the same capabilities as the Hybrid Cloud. Both of them are feature parity, except for it's all managed by H2O. So it is better for your end users, the admin, infrastructure, Kubernetes. And all that is handled by H2O, and you have access to your own private environment, or building your own models and using the platform.
So what's new in the H2O AI Cloud? There are some new things that have come out in the last couple of months that we wanted to show you. The first is our platform API token. So a lot of end users will interact with our platform from the UI or the front end. But a lot of our data scientists are more likely to be using clients in the background. So we have a new easy way to integrate with all of our Python clients securely using a single code, a single platform token. So let me show you right now a demo on how that works.
So I'm going to go to my Cloud environment, the H2O AI, and log in.
And after logging in, I'm going to click on my name on the top and go to the CLI and API Access page. And this page has all the information that I need to securely access from my local workstation. So I'm going to specifically go to the API section, where I can see the different information that I need to run from my local machine. So I can connect to the Cloud in my Jupyter notebooks for building models, or maybe in my favorite IDE like pi charm or VS code, if I'm building an app. So what I'm going to do is go to Jupiter, and go ahead and run one of my tutorials. This is Jupiter running on my local machine. And then I'll go to a notebook that is on my local machine for connecting to Driverless AI.
So other than importing my libraries, what I do to connect is use the information that I found on my platform page to securely connect to this environment.
So go ahead and run the Connect command. And you'll see that we're using a little bit of security. So we don't put our token directly in our notebook. But I have a link that I can click here that will take me to log into the Cloud. And it will give me my personalized access token that can use this token. And I'm now directly connected to my AI engine manager. And I can go ahead and start connecting to Driverless AI using AutoML connect H2O-3 for building models, and so forth. So this works for all of our API's, whether you want to build models, or you're deploying models with MLOps, or if we start using features there, which we'll talk about today. But you have one token that you can use throughout all of your notebooks and all of your code to start developing from your local machine and securely connecting to your platform.
Alright, and then the next thing I want to talk about has come out recently is specifically for our Managed Cloud customers at this point, and I'm going to talk about H2O drive. So I'm going to switch the environment page, thank you, and go to my manage Cloud environment. So here I have an instance of H2O Managed Cloud, that is only for me, it's my internal environment. And again, for each customer, it is a fully dedicated environment. And what I'm going to do here is use the H2O-provided object store to upload data once into the Cloud from my favorite location, and then I can access it in Driverless AI or other tools. So here, I'll go to the Drive app. And I'll go ahead and open up the application.
Alright, so here I can see a couple of datasets that I uploaded ahead of time. I can add a new data set I can connect to my favorite connector, whether it's S3 or Snowflake or upload files from my local machine. But this is one place to import data which I then use throughout the Cloud. So if I then go into an instance of Driverless AI, it will show me the datasets that I've uploaded in Drive and allow me to directly use those.
With a new profile, we can use the connectors tab to connect securely to my object store or database of choice. And my credentials are saved securely for me. So every time I want to connect to my S3 bucket, I don't need to put in my access token. By logging into the app, it knows who I am. And I can securely have access to pull in my data.
So after we bring these datasets in, we can then either share them with other users by creating a secure link, or we have access to these other products.
Now, we're going to talk about what's coming next in the H2O AI Cloud. And the first thing I'm excited to share with you is our new homepage for the Add Cloud platform. So if you're an HR Cloud user, you might be very familiar with the AppStore page, which is our current landing page for the ad Cloud. But we have a new homepage, which our goal is to be able to get all users exactly where they want to go as fast as possible. So this is the first of many versions that we will be sharing with you. And it is available today only internally, this is a sneak preview. So expect this in the next couple of releases. And within the next quarter.
On the homepage we can easily get into where we can build our own machine learning models. So I can easily get to Driverless AI to spin up an instance of Driverless AI for myself to build models, I can, if I'm interested in doing Market Basket models, or if I'm interested in doing Hydrogen Torch, which you hear about today, we also have access to applications that help us learn and control wave. So we'll talk about Wave later today. But it's a way to start building your own AI applications. And here are some apps that will teach us how to use Wave. In the center, I have access to all the things that I personally am doing. So everyone's center will look a little bit different. Here, I have a lot of apps running. So these are app instances that I want to get to easily, I can go directly into it. So if I want to visit the theme generator app, this application allows me to create custom color themes for Wave. And I can get there from one click of my homepage. So all of my apps are here. My pen dapsone are my favorite personal things in the AppStore. So what I want to be able to get and see is available here. And then for any developers, you'll have an imported app section where you can see apps that you've uploaded. So these are applications I and other people might be using.
At the bottom, I have access to common data science workflows. So ML labs for deploying models, I can do text specific modeling here. Model validation, which you'll hear about later allows you to understand if your model is ready for production or not, and auto insights for exploring the data. And then finally, we can always see the latest things that have been uploaded in the app store with the latest uploaded app. And it tells you what's new. So we have a lot of plans for this page. But we hope that helps everyone get into what they need to do when they're in the Cloud a little bit faster and improve your user experience.
All right. And the last thing I want to announce today, before we jump to the next product, is that I wanted to point out our documentation. So this is avAIlable from the doctor H2O AI page. But this is our new H2O AI Cloud documentation with the goal being to get you to the specific docs that you need. So this overall page gives you a little bit more information about what the Cloud is, a quickstart tutorial for how to get started, and tells you what the platform is all about and our goals here. You can also see that major capabilities, how to steal AI engines for building models. For each of these you can get into the specific features you might be interested in. So if you're coming to the Cloud, because you want to build a model and Driverless AI, then maybe you should come over to the datasets and Driverless to learn how to import your data.
So it's access to everything you might need here more information about MLOps and apps. And if you just want to know more about the Cloud in general, this is great. It gives you an idea of our different offerings, how they're managed Cloud and hybrid Cloud work. Who are our target end users? And where do they use different types of functionalities? And so forth.
Alright, so thanks for your time today. I'm gonna pass it off to the next product now. And if you have questions, please feel free to ask them in the chat.
We're using this for the National Youth League. Well, we've done the last copper that allows our customers to begin to work with me so a lot of our customers are now able to come into fully managed processes hosted and operated by H2O. And it comes with a highly secure environment that can have a customer come in bringing the data safely, launch their apps, from the ages enveloping H2O and then selling x logs into it. There's no fuss in addition to our hybrid, one of which is a lot more interesting. But the Manage store offers a very very easy and fast ramp to production to get value from it.
H2O AI Feature Store
Hi, everyone, this is Thomas Brady, Product Manager at H2O. Today I'll be talking about H2O’s Feature Store. I'll run through a couple of very quick introductory slides. And then we'll pop over to our presentation.
So the biggest thing that we want to start out with and talking about Feature Store as a new product that we announced last fall. It's a partnership that we've developed with wireless carrier AT&T. You should think of Feature Stores as a single source of truth for training data inside H2O AI Cloud.
But the word problem does Feature Store solve. So today, many customers are building training models, transforming features, making a lot of investment into all the computation and processing for making the features. But a lot of times that's kept within their own system within databases that are maintained by specific teams. And it's hard for data scientists across an organization to get access to this features. So as a result, you have lost production value that is it really repurposed for other uses, feature data that is siloed within teams. And a lot of times you don't really have a good sense of where your feature data comes from. And it's challenging for you to anticipate drift and any issues that you might have with feature data.
So what is a Feature Store? A Feature Store is the nervous system for AI organization. With it, you can transform your data into features to maximize that return on investment, that scale model production for your deployment of artificial intelligence. And with future stores you can detect and anticipate drift in your data, detect anomalies, and refresh, manage and refresh the lifecycle of your features. And you can also compare Feature Stores with feature rank to get feature recommendations with feature recommended or recommender and offer trade exchange features with feature exchange.
And the big thing that we also want to underscore is that many folks are moving from on prem into Clouds, and they're creating data Clouds. The next level is to move from data Clouds to AI Clouds. And this is where Feature Store will assist. This shows you sort of an example architecture the way a Feature Store works. So you'd have raw data coming in, or process features real time and batch that go through whatever feature engineering pipeline you might use. And then it goes into our future store where there's an online and an offline engine and a metadata registry. And from there features are consumed downstream for model train, batch predictions or real time predictions.
And the biggest thing I want to underscore is that Feature Store is designed with composable architecture. And what I mean by that is that we provide support to any feature engineering pipeline that you might have today, whether it's a Driverless AI Mojo, data, bricks, Jupiter Snowflake, or Salesforce, Einstein. Those are just a couple of examples. But really, it's designed to traverse Clouds and hybrid and on prem. So think of it as being agnostic to any feature engineering pipeline, enabling it to serve for real time inference and monitoring.
And with that, I think I'll start sharing my screen. Alright, so I'll quickly go through this demo just to talk about how Feature Store works. And give a couple of simple examples of how we envisioned Feature Store today. So like I said, in this example, we'll use Feature Store data or Feature Store features to train models and Driverless AI. So the problem here is that we want to predict flight delays, due to weather disruptions.
All the steps are laid out here. Before that, we'll register a new project and a new feature set using a data bricks notebook, which I'm showing you right here. I'm just putting the feature data into the Feature Store, cache, the retrieved raw features and batch and ingest them into drivers. So only do those portions today. Right now our datasets that we're using, in this example, our historical dataset, which we call weather offline, and simulated real time flight data, which we have in a CSV file.
So in this story, I've laid out a couple of Persona server personas that we use. In this case, I'm using superheroes from the Marvel Cinematic Universe. T'Challa is known as Black Panther, he’s a data engineer who registers and ingests the features to future store from various data sources. Auro, who you might also know as Storm, she's a data scientist who consumes features for features torque and creates a model logic using Driverless AI. And then Peter Quill, you might know Star Lord from Guardians of the Galaxy. He's a data engineer who ingest new features to the online Feature Store. And we also have Scott who will continue throughout the story as we do this, the Senate demo over and over again, he's a data scientist who retrieves data from the online Feature Store and scores. So we'll start at the very beginning here where T'Challa, aka Black Panther, sets up then connects to the H2O Feature Store.
Once we're connected, all we'll do is we'll input this example data source dataset that's offline weather data, that historical data. And then we'll also ingest the airline source, which is a large data set that simulates real time weather airline data coming in. So now that we've ingested all those two challenges, we're gonna go through and register new features, first extract the schema from the two datasets, and create a new project, then he'll register the schema as the feature set and just the feature data.
This process will go through all these steps, because especially with the airline data, it's a rather large dataset, but I'll skip ahead to through all the steps where we registered the features. So with a long set it will do as we extract the schema. Once that runs, we ended up creating a new project that we call flight delay prediction demo that has this little title called pipe predictor, create that new project. And then I register the schema as the feature set inside that project. Once that runs, you can see it creates the project name and the feature set name has all these attributes related to the feature who created, the time that it was created, and what it's used for.
After that, we registered the weather schema, which is just another set to create a feature set out of the weather view. Again, we have all the metadata related to that feature set. And then from there I go and execute the ingestion step to ingest all the actual features from your data into what Feature Store executes. When I go back in, I joined the two feature sets. Here, I'm going to join on the key date so that we can combine them and do transformations from those features.
Once we complete that, we do the same exact steps where we extract the schema from the join feature sets. And then we ingest them into the Feature Store. So first T’Challa does the same exact step where he registers the airline schema and ingests the joint features.
And then from there, we download the airline weather features as a data frame and then retrieve them as a spark trade here. And then moving on. Now we're gonna go to Aurora. Aurora, as you may know, is Storm from the X-Men, she's gonna use the feature set to build the model in Driverless AI.
So first, we said a little a couple of simple helper functions that we're using to pull out the parquet file and download and extract the Mojo so that we can pull out the features when we run the experiments and then have connection handling setup to Driverless whereas inputted my drivers URL and the access token once actually does connect to Driverless and retrieve all the features. So from here I'm going to do the driver dataset.
While we're waiting on this command to run, I'm going back to the top. We can talk about it with all of the users here. In this scenario, you can imagine that a data engineer has been managing any of the feature engineering pipelines within their organization. And at this point, they're connected to the Feature Store as a source. They're managing connection handling setup for the data scientists. And then data scientists come in and they're able to shop. You can think of them browsing through the Feature Store to find the right features that they want to use for their projects. And what we can do is also go through a quick run through of the UI and features Forbes probably.
Alright, so I'll give a real quick walkthrough of the UI. I'm already on this command set to do it. So the first thing you'll see here within the Feature Store is that there's kind of three main areas along the header, you're going to have a very simple dashboard that shows you an overview of your features, for instance, and a search bar where you can conduct advanced search, and filter and facet off of whatever dimensions that you want to. On the left hand side, you're able to see where projects and feature sets are, if they're able to manage access to projects, and manage access to feature sets. Within the Project tab, you'll see all the status of projects that are locked or unlocked, and all the winning access permissions. Within feature sets, you can view all of your feature sets, or see all the feature sets that you have access to within the Feature Store. And you can manage and view all the access requests that are coming your way and grant access to other folks in the future. So within the feature sets, I can open up one feature set here, this is another example of the weather flight delay prediction. And within this feature set, this is called the feature set detAIl page. On the top side, you have the name of the project associated with the AIrline schedules, number of features and who the owner is. Under the key detAIls and the detAIl page, you'll see the description of it was created version, the feature type, data sources were processed there was and you'll see things related to monitoring tend to live any special items where you have sensitive data such as PCI, RPI, SPI, etc, then your feature set. And on the right hand side, you actually have to be able to drill down into features and see feature metadata related to the features. So of the datatype the variable importance, what version of this feature is, and what the recent version change was, along with other metadata, such as feature statistics. So from here, we'll pop back over to our notebook process here.
Okay, looks like I'm having a little bit of issues here with this dataset, it is rather large. This worked before. So maybe what we'll do is we'll pause right here. And we'll come back and mediate a little bit and with that, I'll turn it back over.
All right, so the new animation that you're building to delete the last few months that shouldn't be easy. Edie and I wanted to bring up the next product over here quickly, which is fabulous.
H2O Driverless AI
Hi, everyone. I'm Megan Parker. I'm a data scientist at H2O and today I'm going to be talking a little bit about Driverless AI and H2-3, two of our machine learning products that H2O has. We're gonna start with Driverless AI and we're going to touch on what's new in the recent versions.
Driverless AI, as many of you know, is our automated machine learning product. It encompasses best practices from Kaggle grandmasters from our team to really reduce the time to build a model from months to hours.
It's doing a lot of automated machine learning, but it also offers playability. So while we're incorporating these best practices under the hood, we like to provide reasons around why the model is doing what it's doing explainability and fairness.
Today I'm going to be talking about some of the new features that have been added to Driverless AI and the last major release. I'll be focusing a lot today on recipe management. So while Driverless AI is really automated, there is the ability to add recipes to the experiments and just give a lot more custom integration and control. We've added a recipe management to list recipes, add recipes, and most importantly, edit them within the UI.
And this kind of leads into our second new feature transparency. This is, I think, gonna be really cool to show. But with each experiment, you'll be able to get Python code that's auto generated for the final model. And what's great about that is not only can you see everything that's happening in the experiment, but you can actually edit it. And we're going to talk about different reasons why you might want to do that and how to do that today in our demo. The other two features that were recently added that I'll talk about is the Admin API. So you created an Admin API for admins, so that they can manage entities created by other users. And then finally, we've added Mojo Shafi support router, and the C++ Mojo. So the C++ module is offered if you want to deploy in our Python environments. Most recently, we've added Chapuis reason code. If you're familiar with shaky reason codes, they add a little bit more information to the predictions and how they're being created. So in today's demo, we're going to be talking about if an employee will leave a company. So rather than just getting the probability of an employee leaving, we'll get the reasons behind it. And now that's supported it in a shockwave.
Alright.
Okay. So with that, I'm going to jump into a demo.
Right, I'm in Driverless AI right now. Today, we're going to be doing a demo of employee attrition. So I can in Driverless, let's say, I click on the details page, and see my dataset.
Here's my data set rows, I have attrition, the column that I'm going to try to predict. But I also have a bunch of different information about the employee. So we're going to use Driverless AI today to try to predict, we can target approval quit, I'm going to select my target comm which is going to be attrition.
And with Driverless AI, that's really it. I'm going to lower some knobs here for the demo purpose, but I don't have to provide much else. Driverless AI is going to, as I mentioned before, encompass all these best practices. So it's going to check for data comm type, it's going to check for leakage. Is there a drift happening? Have we split the data to check how well it's doing. And then most importantly, it's going to do automated feature engineering, automated algorithms collection and automatic model tuning. This is all happening under the hood, it just has my whole dataset starting to build models, you're gonna see that pop up here. So here's my model on the left hand side, the variable importance is in the middle. And some of the variables we're seeing are automatically generated by Driverless AI like business travel, this is the target encoding feature. And then I can see how well the model is doing on the right. It's going to keep doing this until it finds the best model, I'm going to switch over to a completed model.
This is my same employee dataset, but it's already run. And you'll notice the yellow buttons pop up once it's complete. So there'll be things like model interpretation, download that deployment objects for scoring, you can also turn the experiments. And if you click on this, there's an individual recipe button. And I'm going to click on it.
And we're going to upload it as a custom recipe.
Now, as I said, that auto generated Python code, this is going to tell me pretty much exactly what that final model is doing. So now I have a lot more transparency into the model. And most importantly, I can edit this. So I'm going to go down a little bit to talk about two of the functions that I think might be most valuable to our audience.
The first is the model. That model function. So this function is actually just that, showing you all of the parameters of the final algorithms, so I can see the light GBM model that was decided on. And here's all the parameters that were used for the final model. Now, if I was so inclined, I could edit this and do slight modifications to my model, either, I think maybe the performance may be improved, or I want to do it from the surface. Maybe, for example, increase that regularization a little bit.
The other function in this code that's really interesting is a set game. Now, this is all about feature engineering. And a lot of times we hear requests, like, you know, certain features that are engineered. We don't like you know, from a business perspective, that might not make sense. Or the other way I need this column to be in the model. Both of these can be done and even further customizations in this step change function.
I'm gonna go down a little bit. Here, I can see all of the features that were built into my model, the beginning of the features are going to be the original ones. So age has an original transformer, nothing was done to it. But I can go ahead and remove that I don't work with this particular feature and I'm going to delete it.
If I go down further, I can see the features that were engineered by Driverless AI automatically. So here I have business travel, the applied targeting coating on it. I can modify the parameters of this car. In encoding, I can remove it completely, or I can force it in its force, the model has to be right there to get more control by looking at this particular code and again, editing it, I can save this as a new recipe and activated driver, okay, it will automatically check the code to make sure it's okay to use. I'll go back to my experiments tab. And let's try to build another model with this recipe.
It's like my target column again, in nutrition. The major difference here is I'm gonna go to our experts, expert settings, click on recipes. And I'm going to ask to include a specific individual. This is my new recipe, my individual recipe, save it. And on the left hand side, you'll see that rather than the typical display here, it's all going to be custom individual. So I've customized this completely. When I launched the experiments, rather than running through all of the methods and stuff as before that feature evolution model tuning, it's actually just going to build the final model for me. So I'm gonna get a final model, with those modifications that I made in the Python code. What's great about that is I'm still going to get some the Mojo so I still have that completely independent Java object for deployment, training my model now. And once it's done, look at that, that button to get the deployment object and interpret it and all of the things that I normally would do with the Driverless AI model.
With that, I'm going to go back to my slides and talk a little bit about H2O-3.
H2O-3
H2O-3 is another machine learning product we offer. It is open source distributed in memory machine learning. So each two or three, all the algorithms are built by our engineering teams, they are actually boots, they're all built so that they're distributed.
What's great about H2O-3 is I could import unlimited amounts of data. As long as I have a cluster big enough that I can still connect to the apiary cluster using Python or R API's. So if I really like our studio, or if I have, you know, pi charm or Jupyter Notebook set up on my local computer, I can still use that to connect to the largest jewelry cluster that's running on the Cloud, around Hadoop World cetera.
All of the algorithms also support this Mojo, this dependent Java deployment object, so I can go ahead and build my model. And then I have this really low latency deployment object that's really flexible and independent. They were going to be discussing what's new and h two or three and also a little bit about how you can use each two or three in the AI Cloud and Michelle was talking about.
So I'm going to talk about this and we're going to demo it. But we have a couple of new algorithms that were created. We also have pre and post modeling additions to the platform. And I forgot to mention, we have a new ability to import Mojo's into any issue, a free version, that you have models created in older versions, you can import those models and newer h two or three versions for comparison purposes. So this can be really nice when you're thinking about whether or not to use a model. And then finally, to have explainability.
These were all added pretty recently, when it first touches on the algorithms that were added. So one of our new algorithms is called the uplift model. It's a little bit different than a traditional supervised learning model, because we're not just trying to predict the target column, but we're trying to predict the target column in relation to some treatments. So going along this example of a lead converting to a customer, I may decide maybe I can get a lead to convert if I offer a discount.
So this particular model isn't just figuring out if a lead will convert to a customer, but it's figuring out what will lead to a customer if they are targeted with a discount. So there's this context of a treatment occurring. And the output of the uplift model is going to be this graph on the right, so who's persuadable, who would actually convert if we offered a discount, who's a sure thing, they're going to convert to a customer no matter what, who's never going to. And then finally, who might have an adverse reaction to any marketing, so maybe it will cause them to go the other direction.
After I demo this for a minute. The other option we've had for a while, but we recently added multiclass support for both that model. Well, that model generates rules using decision trees. These are the linear models to filter the world and then create clear text rules that you can use to predict.
So I demoed that we've also offered some pre and post modeling, so feature selection with Instagram. So this is a new algorithm that is used to determine which features are not invisible. And also a model selection tool box which is DLM specific, so linear model specific, but it gives you this idea of what are the best predictors. Given the constraint that I can't have more than n predictors, and I'll show this to you.
And then finally, explainability. So we have a lot of global explainability methods available like variable important partial dependence plot, the Shapley summary plotting, showing on the left hand, we also have our local explainability through Shafilea reason code. And this is a graph for a specific route. And what's great about the shabbily reason codes is that it's also available in our Java objects. So again, if you want to not only know who's going to quit, but why, that's available in our deployments.
Alright, so let's go to a demo. I'm going to start by going to our API call that Michelle was showing, and we're going to start by creating an h2 as requested. So to do that, I'm going to go to my AI NS and on the top and click on the H2O menu. To launch a new cluster, you can click the blue button.
And what's really nice about the AI engine manager is that I don't need to know how many nodes a cluster should have or how big the node should be, I can actually just give it information about my dataset size. And it's going to tell me, so if I have 10 million rows, 300 columns, how big should this Cluster B, and it tells me I should have two nodes, each about 50 gigabytes of memory. So this helps a lot, it'll automatically optimize based on your data set size, start the cluster for you. And once I've done that, I'll get this blue hyperlink. I can click on that and see flow, which is our web based UI. I can do machine learning by pointing and clicking or I can connect to this through Python. So I'm gonna go to Jupiter and show this a little through Python and features.
First thing I'm going to do is I'm going to import my data, we're going to use the same data as before from Play turn data. And I'm going to use the Infogrames to see which predictors might be helpful, which maybe aren't relevant. I'm going to call this Instagram model. And we'll see the plot. I can see all my predictors here. And you'll notice that there's this red line.
Any features inside that red, not red line, we can consider maybe not that helpful. And there are two ways we do this. One is total information, which is really, you know, is this variable going to be used by the model? Is it predictive at all for attrition? But the other part of the plot isn't that information can be really interesting. Does this feature bring any additional information if it can get off?
If there are redundant features, we don't need to use all of them. I can see this information in a table as well. And we see total working years for example, while it has information regarding attrition, it has no net new information.
So if I take a look at a correlation matrix, I see the total working years is highly correlated with job level, monthly income near the company. So while it is relevant, maybe with all those other features avAIlable, it doesn't bring any new information for the model. This is a really easy and nice way to figure out how to filter down your features to our strong core set of features.
The other feature selection method we've recently added as model selection toolbox is nice to the linear model, but it will automatically figure out the best number of predictors up to seven, as I've sAId, so you can modify this as you want to, but you'll see a table, and we'll give you a list of the features or predictors within this limit, and the highest R squared value. So again, another easy and quick way to figure out the best features. And this time was in the context of a linear model.
Going further, let's start by building a model. So we talked about the uplift model, which gives us that prediction of a target column hit within the context of some treatment. So let's say we think we can prevent people from quitting as we say they're not, they don't have to travel frequently anymore. So that's going to be our treatment.
We're going to build uplift Random Forests estimator, it's going to be the same as any other supervised learning model, and H2O three, but we're going to add this treatment column. So we're going to try to predict with the context of whether this treatment is applied or not.
And the output when you predict is going to be a little bit different, you're gonna get this uplift prediction. So that is how much of the prediction changes if the treatment was applied. The negative value says they're less likely to quit if they didn't have to travel frequently. So not only are we getting a prediction of churn, but we're also getting a sense of who we could target with maybe the incentive of less travel, append employees.
The other new algorithm that we can show today or will fit well, if it's going to generate a federal rule for me, and I can pull that rule about using a blue important function. So I've asked for no more than five rules. And the length, as a rule, can't be more than five either. And here's my rules, and I can see them in a really clear format. So if the overtime is now your total working years is greater than two and a half, and they've been at the company less than 30 years, they have allowed, likely less likelihood of churning.
Now let's build some models. Let's explain them. So I have my DVM model here, I'm going to build it, a tool that offers a lot of out of the box explainability. So I can look at a variable importance plot, I can do partial kinds of blocks, Alexei.
And see, for example, how the prediction changes for different job roles or get certain job roles more likely to cause a term. We can also call this explain function. And this is going to run everything automatically. So I get this report right away, it'll show me how the model is performing on a dataset. What does variable importance look like? Shapley, partial dependence plots, and so on. So this is really nice, if you just want a kind of overview of the model really quickly. This is a relatively new feature as well.
So now that we've talked about some of the new features, I'm gonna go back to our app store and talk about what we can do with those models. Now that we're in this hyper Cloud. The first thing I'm going to do is I have an instance running Autodesk so we're gonna go and visit it.
AutoDoc is automated documentation of my model. Now this comes out of the box of Driverless AI, I'm sure some of you have seen this download Autodesk button. But you can also get the AutoDoc within the hybrid Cloud through this H2O AutoDoc app. So I can ask to create a new AutoDoc and select it from an H2O-3 moja. Yeah, but it's going to be an automatic documentation with experiment overview, a few additional things like.
Like, feature importance, the final model, how to do information about how to reproduce this model. And partially, they also offer additional information, the appendix depending on the algorithm. And I can download this in different formats. So that's one of the nice features of using the hybrid Cloud, which was great. The other thing I can do is deploy the model. So I made the Math Model, I have a mo job, I can use the MLS platform, which we'll talk about more later today, to automatically get a REST API that can be paying to get predictions in real time, I can create a deployment I've already done that using the H two or three Mojo. And I can click on that and you'll see a sample curl request that I can pay to get predictions for bleachers. This is one of the nice features as well as using the hybrid Cloud. Now that I have the Mojo I have a really quick and easy way to deploy the model and manage it.
I'm going to jump and talk a couple more slides about what's coming. And I'll pass it to our next speaker. So what's coming soon at row three? With JVM improvements, we're adding more robustness to outliers. And we're adding interaction constraints.
And then another thing we're adding to DLM was an influence diagnostics. So how much does one record influence the model coefficients? Do outliers really cause a model change significantly? For post modeling, we're adding the ability to import photos into newer H2O-3 versions. So if you have an older model with a poll, Joe, you can import them into newer H2O-3 versions in the future. And we're adding more motor support to our new models.
Just to touch quickly on our GBM improvements, we are adding a uniform, robust spinning. If any of you are building models, you might notice that if you have a few columns, range based spinning, where I'm bidding based on the range of that x axis, causes a lot of empty bins. So here I have an outlier for income. And when I flipped by range, I ended up with all these empty bins.
The uniform robust spinning is going to split the non empty bins and future iterations based on the error. So bins that have a lot of error, we're getting them wrong a lot we're going to focus on and slip. You can think of this kind of like contravening where we're rather than bidding based on bidding based on population of each of the records in each bin. But what's nice about this new bidding method is that, as you know, our tests have pretty similar performance to Pantel bidding when you have a few variables in terms of accuracy, but the time to build is much much quicker. So we have this really hopefully similar accuracy to the content bidding. It was a significant reduction in time and that'll be coming out in our next H2O-3 release.
This one, just to highlight this, is a whole bunch of information to be added to AI and digital clean law for the customers and users. We should be able to take advantage of all the new algorithms, especially the customer university that maybe should have had earlier. It's a big game changer that allows water for large enterprise customers, especially with regulated use cases, to be able to get full transparency insured. So you can take and model and as I point and edit every single customer need.
So, super excited. This is a big, big bag that I am offering to customers. And then I'm going to hand it over to the next speaker, Dimitri Gordy. You are one of our cabinet grandmasters and also manager for our Hydrogen Torch moralization product. He's going to talk about both of those.
H2O Hydrogen Torch
Welcome, everyone, I am fortunate to talk about the product which we launched quite recently, just a few months ago. So I will take a little bit of time to go through the basics about the product.
Hydrogen Torch is our deep learning back end. So it's a product which was built from the point of view of providing you with the tool to build deep learning models. And we're focusing on unstructured data as the input. So we're going to be talking, we're talking about NLP and images. And today, we're gonna be talking about simple audio data. And with Hydrogen Torch, you are enabled to build state of the art deep learning models for unstructured data you have. So we're talking not just about shipping, pre-built models and common tasks. So you will be capable of training models, to your own data and to your own downstream tasks, including all the state of the art techniques, state of the art architectures. And, of course, transfer learning as a part of it. Last but not least, we are also putting a lot of tension on the ability to deploy and bring it to production. So of course, we have it integrated with the ML ops, which you will hear about a bit later, which is our product to serve the models. So besides Driverless AI and H2O, three models serve as a way to also deploy deep learning Hydrogen Torch models and serve them in production to solve your business needs.
What are the key points of Hydrogen Torch? First of all, we're focused on building UI. So a no code interface for you to start building deep learning models right away. That will require way less headache from your side, to code everything in, because everything is already built, and well tuned and tested for you. And especially for those data scientists who have not that much experience with deep learning. Overall, this tool can be a quick start to just put the data in and start producing the models, which have very, very good performance. And probably equally important also to gain experience about how deep learning works, what are the tricks and what are the important things you can use in deep learning to get the best out of the data you have. So we also see it as a tool for learning and getting more experienced and look more experienced being able to build more accurate models with Hydrogen Torch.
We have a variety of text, images, and with the upcoming release, audio model, problem types to solve. So we're talking not only classical classification and regression, many other tasks included and this set of the tasks is being constantly extended, and of course driven by the demand in the market as well.
And mentioned the training best practices, which not only includes modern neural network art textures and transfer learning. But it also includes lots of training, ideas and training techniques which were developed in the past years, which actually bring the new neural networks to the state of the art level. And sometimes, making the best out of the training practice gets you a better result than just building a larger, heavier model or using more complicated neural network architecture.
All these parameters also, of course, require some tuning, and we provide the ability to. To select the best model to run grid search to search for the best model accuracy, and pick the most accurate model of all the possible combinations of parameters, neural network architectures, and so on. Last but not least, is inflexible deployment is an oval already mentioned, where natively deploying Hydrogen Torch models to H2O MLOps. But we also provide the ability to download a package as a Python will package over the models you build, and deploy it to your own Python require a Python environment, if needed.
And now let's jump to what's new on Hydrogen Torch. We made an official launch just a few months ago, but since then, we had one minor release and one kind of a larger release coming later this month. They both included quite a lot of changes and improvements. But I would like to mention just a few of those, kind of the major ones. The first one is a new set of object detection algorithms. With this item, I would like just to emphasize that we're enhancing the tools which are already there in Hydrogen Torch by means of trying it out against current competitions and learning on Kaggle. About the new techniques which perform better than the rest. And after each competition, we just collect the feedback from the community, we collect our own experience, and implement and add new ideas and algorithms into the tool. And that happens with object detection. So we're adding efficient depth and few other object detection algorithms, you will be able just to choose out of the list of the algorithms there without the necessity to code and test them.
Few other large changes in items listed include instance segmentation problem type, I will show it in detail in the demo. So this is a new image problem type and an extension of the 12 problem types we had before. We're adding draft camps, which is a way to explain model predictions and with the grab camps, we're introducing the engine of model explanations in Hydrogen Torch, which will be of course, expanded and improved over the next releases. We're starting with image data. But of course, we'll expand it to NLP and audio. And last but not least in the least, we're introducing deep learning for audio.
Let me just give you a quick overview of these last three points with the instance segmentation. That's a new problem type where we have several objects we would like to detect on the image. And with the instance segmentation, we're not only detecting exactly on the image they're located but we're also isolating them one from one form or another and indicating and recognizing each individual object. In this example, we're looking at the cells on an image and we need to recognize each individual cell, not only all of them together as a whole.
Let’s go through the explain ability technique we're introducing here. The examples of the grab camps applied and captured from the current hydrogen course development. On the left hand side we have two sets of the image examples where the model is supposed to classify the images to find planes on them and grab camps. Tam is an algorithm to detect the area of an image, which drives the prediction done by the model. So, with graph camps with each image, you will be able to not only receive the prediction, and for some problem times confidence, but also an attempt to explain what is the error on the image that drove the prediction of the model. In this in this left hand side example, where we're making sure that the model is trAIned on recognizing the planes and on breg background or any other features of images that can miss land or over.
Over fit the model. On the right hand side, we have examples of an image of a task called distracted driver distracted drivers, where the model is expected to predict if a driver is paying attention to the road or if a driver is having a sip of coffee or talking to a passenger. So there are 10 classes of driver behavior. And in this class is the multi class classification task.
We're looking at the grab camps. What model is paying attention to when trying to recognize the attention of the driver. And as expected, we see that the model is focusing on where the arm of the driver is, where the driver is looking at and all the important things we'd like the model to focus on for this task.
And the last point in my list was deep learning for audio. This is something we're introducing in this version, we're adding audio support for classification and regression tasks. So here you see the screenshot of an example. But let me just switch to a demo to show it to you live.
Let me just jump into the classification task and show you an example of a model. I'm sorry, let me show you the data set first. So we're talking about an example of an audio classification task. Where the task is based, is to recognize the birds based on a short recording of an audio from a rainforest. So we have quite a lot of records, each record is just the three second audio. And each recording can contAIn multiple labels, we have them coded but I think we have around 20 different species of birds, which the model is expected to get to recognize from from the audio. So in some examples, we have two birds and some one bird. And in some, we can see more.
And I have an experiment, which has already finished running for a disorder classification task. And let's look at the prediction insights over here. You see that we have actual pictures, not audios over here. And this is very much intentional, because the way we solve this task is we transform the audio into spectrograms. And then we solve it as an image task, which has quite a lot of benefits. Because whenever we convert it to an image, we can use all the modern image neural network architectures and more importantly, transfer learning from images. And that works very well even for audio when converted to spectrograms. So here we see a couple of examples of spectrograms of these recordings, we see that these words, this one in particular, was perfectly predicted. So the true label was 23, and the one we predicted, let's look at some more challenging examples we saw. So let's have a look at this one. So this one had a recording of two birds labeled one and 10. But the model predicted one, three and 10. So we have a false negative, and actually a false positive sorry, non predicted one and three and 10 will have very low confidence. So we can use the tools we have in Hydrogen Torch already out of the box with prediction insights to investigate the audio data through the spectrogram to see some of the challenging examples and potentially see which types of the recordings at least visually cause more challenges to the model.
Um, let me stop here with regards to Hydrogen Torch and take the questions in the chat and pass it to the next presenter.
So just to reiterate - folks who have not tried H2O out before, I definitely highly recommend you to come on the show at AEI and sign up for our free trial and actually get in touch.
And things in a tremendous amount of sophisticated, deep learning the link in the notebook interface. So we made it extremely easy for all our users, it has picked up their expertise in deep learning or learning to be able to take advantage of the latest latest and greatest innovations that are happening. This is a product by our caravan master key. So one of the innovations and best practices teams have been covering the product is a game changer if you're looking at a lot of these kits that Dimitri referred to earlier, to be able to use this moment. But the nice thing about this is all of this is again managed completely in an AI Cloud AI called your environment is taken care of and bound to produce, they cannot vary. So super excited about that.
H2O Document AI
Document AI is a product that we launched only this quarter, earlier in January, and this is a phenomenal traction. This opens up a completely new set of use cases, which get donated document information.
And if you're not already, use Mark Landry, who is also one of the cabinet ministers and longtime veteran of H2O. And there's innovation. Hello, thanks for coming.
Document AI is a new product that we launched a few months ago. And we have a new self service UI that sits on top of that now. In November, December when we launched, we had a nice new interface that's a self service user interface. So I'll show a little bit of that. At the end, we'll talk a little bit about what document AI is, because as we've been talking to customers about it over the last few months now there's a lot of lack of clarity, I suppose ambiguity of what we really mean with document AI, and people just meeting us in all different spots where it is. So it's been good for us to learn from speaking with some customers and learning some use cases. Beyond those we have firsthand experience with which that's accumulating as well.
So the really basic solution space, you know, the vast reservoir of untapped insights in here, your electronic documents, document images, like faxes, forms, other semi structured camera phones, we're getting documents in all different ways. And you can think of documents as an image as the old school fax, the new ones are PDFs, but they're just pictures pretty much. And so the untapped part is - definitely what we're finding out from customers - is that there's a lot of people that have these documents, and they're just sitting around. It could be that your software that you use in your ERP system, or we talk with a lot of manufacturers, it produces documentation, and it just sits there test runs, things like that, and so untapped is that there's data sitting in there that didn't necessarily go into your ERP database, your data, Lake, whatever you're using, just kind of sits trapped in those documents. And so some people are using it for validation of their database type, a nice tabular data set to make sure that it checks it out. The only other option is that it's in, it's trapped in a document. And so a validation use case is a very common one that we're seeing. So H2O document AI is designed to understand those documents, process them, and manage the process of creating these as well. So we'll take a look at that with a self service UI with the unstructured text data, unstructured, semi structured, it's sitting there, you know, in different format forms, but it's not just NLP, we're not just picking up an NLP dataset, regular text and processing it, but we're going to be very similar. And so we'll talk about a hybrid model that what really would document is underneath.
So looking here to see who benefits from this. First of what we've been talking in the last several months with customers, and so this is wide array of people, business leaders who don't really want to get into the nitty gritty of what we're doing, you know, but they really they know the documents are out there, they've got to get something done. They're already looking at an incumbent process, perhaps which is less efficient. And so we're seeing a lot of those kinds of replacement sort of things. So operational leaders all the way up to the C suite, especially the data analytics team. There's data that they know that's trapped there that they may be able to augment the model, something like that workflow users especially this is where you have an incumbent solution, someone's already sort of reading these documents by hand typing them up, getting specific information out of it. I haven't really said that yet.
But a really common use case is going to be an invoice. And then you know, if you have multiple vendors, hundreds, 1000s of vendors, and so as a lot of our enterprise customers do, every single invoice is going to be a little different. But the core information is there, we as humans kind of understand it really well. You want the invoice number, you want the purchase order date versus the date of shift versus the date, the bill is due, those are all different dates. So your basic tools will tell you that those are dates. What we're trying to do here is extract specific information that connects with your business processes. Here, the users of the tool, we're building our data scientist and labeler. So far, as we talked with customers, we're looking into how we can move that forward. But right now, I'll show you the Self Service UI in a few minutes.
And that's meant for the data scientists to build models, and labelers to help either to create the datasets up front. We're making that as easy as possible, and also reviewing them on the back end. So how do we do that? In the middle there, the document AI, self service UX again, I'll show you that in a little bit. Intelligent OCR, there's really two big building blocks that have happened here. It's more complicated that there's more than four or five that really get involved in a pipeline of handling a document. The two big building blocks are those next, the second and third bullet point. So an intelligent OCR system, OCR is optical character recognition. But there's multiple ways of doing that.
A lot of people were talking to you are kind of familiar with OCR of maybe 10 years ago, or even current OCR that just isn't really up to the kind of tasks that Dmitri just showed us are capable at of Hydrogen Torch, you know, convolutional neural nets fancy, you know, deep learning computer vision algorithms have come a long way. And they're doing a good job with OCR. But our intelligent OCR is actually a dynamic OCR system because many of the customers, maybe half, probably two thirds, have clean PDFs actually, or they have a mix, they might have some clean PDFs that have come from their own systems. But they also have incoming documents that may be through a fax or just some other kind of picture format.
And the difference is, if you've authored a document, the text is just sitting there, you don't actually have to use a computer vision algorithm to read the text, it's just part of that document, copy paste in a PDF. If it's an image, there is no text. And so our system, we built it to pattonville batches dynamically and figure out what we need, and use the state of the art algorithm when we need it. And use also state of the art, it's not even straightforward to just process a PDF, there's a lot of intelligence that goes into what we're doing in there. So that you don't have to think about it, you don't have to use the right tool for the job, use ours, which will itself use the right tool for the job. And the second big piece there is multimodal deep learning. So it's very common to NLP. These documents look like text, we read them like text. So the core of it is really handled like a natural language processing problem. But the location of the text is important too. And I'll talk about that when we see some real documents. And you can envision this in your head that we're not just speaking left to right paragraph form, we don't look at blocks of text, even something kind of ugly, like a Twitter or something is still going to read roughly left to right. When we send documents to each other we send tables, we send chunks of information that split left and right address header is on the top left, things like that. And so the layout of that document is important. That's how we convey information without having to type literally what we mean with everything on there. So it's a very concise format, we usually send information.
And then another key piece of this is the document AI MLOps working with pipelines that do those two basic building blocks, get the characters out from PDFs or images, and also do classification. But there's multiple classification models people want to run. So you want to take specific parts like I spoke about with the due date versus the invoice date versus the purchase order date or something like that, you know, all three of those, we might classify them all separately, or just get the ones we want. But we can handle page classification as well. So UCSF, we have a lot of customer videos of the kind of experience we got with them in the summer.
Their pipeline has two parts, it actually gets a fax that a medical referral is what they're interested in. But often a medical referral coming in through a referral fax includes all sorts of other information related to that. So it could be just a fax cover sheet, medical notes, clinical notes, things like insurance information, various different types of documents. So the first thing we're going to do is classify what each of those pages are in part of that fax. And then specifically, if so far, we build the referrals pipeline, we'll extend that to other pipelines too. But the referral document has 115 different things that they want out of that referral. And our AI models have gone. So we do both of those algorithms at the same time.
And at the end of the day, the way they score that is a document goes in JSON comes out through our document AI MLOps, which is a really simple REST API to use. And I'll show you a little glimpse of what that final output looks like too.
This is something that I guess a lot of customers haven't really thought of too. So we're dealing with it, people don't quite think of what piles of data they might have around. Or like I said, they haven't come in the process. And so the new value, and often be the next I'll talk a little bit about what we're finding is that the robotic process automation, RPA, templates, Cofax, UiPath, these are all kind of in that space of handling documents, one by one by one or one format by format. So if you have a common 10 vendors, you might create a way of doing document AI. Without the AI portion, essentially, I'm going to click on this box. And this is where this piece of information comes from. And you can do that and UCSF had done that to about 100 templates, but they just noticed that even the Pareto Principle didn't really apply. They weren't getting it at 20 out of it, they were still covering only about 60% or so of all the provider groups that sent them referrals. So they had processed them one by one by one, when we got from this provider group. This is the way that their form looks. But when it goes outside that form, it has nothing. And so what our tool does is use AI to develop a generalized understanding of what these documents are. So that as the format changes, that's okay. The way it's referred to the orientation of it, how it appears, you know, the all of these change when you don't control the input sources, usually what we say that's where our product thrives, because we're noticing a lot of people are just running into a wall eventually, with the template size.
What can you do with those documents once you can get the information out? There's several different use cases where people can do the validation exercises. That's what we had done with PVC, a while back, we get bank information and extract the information out of that bank information, which is locked in a PDF. It's not an EDI extracts, you know, it's not a clean CSV, it comes in differently for every bank and mirroring that up with what a company says in the general ledger. Alright, sorry about that. Okay, so here is the document AI self service user experience, the user interface is basically lAId out on the left side, we have different projects, we've got a lot in here for our testing. But typically, we’ll run into customers, we had three of these at PWC. We picked up over time, three different documents, three different independent sets of information, you can organize these however you like. Continuing through, I've got the medical lab test pulled up here. So document sets is where we'll ingest a data set, I'm not going to show that just the interest of time, but we can do some deep dives on this, we've done a few material that we'll get out there, our documentation set, our documentation website is full, you can read and you can walk through some of these examples. Annotation sets are where a lot of this happens when I'm clicked on here, this is how you work with those original documents. And just to show you what I mean, I've got two loaded, pretty small 1424 pages, there's some PDFs in there. Another set that may have come to us later and actually did it when we were doing this 20 different documents with 90 pages. What do I do with those, I can run the intelligent OCR. And then this attributes column here shows me the different forms that the documents take. So we've got text, show what that looks like, you can really envision what this is going to be the OCR results. And then labeling class are kind of special things that were to enable us to do the page classification, or the entity recognition. And so let me show you a little bit of what these look like.
I'll show you originally also how we label. I'm going to flip into something we call page view, there's really two ways of operating you see a pretty normal kind of user interface here. As we walk through some of the information. As our data kind of matures across the pipeline, we build models and so forth. But a big piece of this user experience is mimicking what we spent a lot of time with as we learn this through actual use cases. And those documents are very visual. And so seeing things late labeling things, how we create the data to trAIn the model tends to be a visual process, we need to show the models where the information came from not just the text that we have both so we can see here this user experience, we can see the documents, we can move between documents, like I said, we don't control the input source and this we might get medical lab tests from all sorts of different vendors. And the actual format shifts around but you can see even just not being experienced with this, the basic shape is very similar. They're gonna refer to it as the column headers are different but the content is similar, we see some scratches of some marks through here, these are different and we can handle all sorts of different document types. And again, this way we thrive when the input source changes. And so we can use this tool to create from scratch, we can create the labels that we need, however you're going through your document type. This is an interface that will allow you to create a project where you can pick things I've already set up over here.
But it's very easy to create a project from scratch and get them labeled to To start out, let me show this is what I actually did this myself. So we've got different columns here, roughly. And we're teaching the model that all the text and here's a line text description, this is the value, this is the units, and so forth. So there's going to be different use cases with different classes. So bring your own sort of recipe, this has meant for custom recipes, we're learning there's a lot of traction with some common recipes, too. So pre built models in the supply chAIn are definitely showing interest as we've talked with customers. But this tool was designed to let you build document pipelines for the information within these documents that matters to you.
With this interface, we get what we want to trAIn the models, we get the text location, let me show you what a more detAIled one looks like in that way. So here, we see all the OCR tokens.
We see this as the classification labels here. So I can see that I've got my line Test Descriptions, it's broken out into each token. And here's the token value. So the results of running the OCR process, this is all under one, one roof, we've got a lot of different things you can do within here to move to a dataset that's trAInable. And to skip ahead a little bit and not take too much time. You can also see that I've already run models against these. So I've created my labels, I've merged it in with OCR, and at this point, I can trAIn a model. And then this is, we can see the accuracy of that as well, with all the typical data science kinds of ways where we're doing classification generally. So you're gonna see some common precision recall f1 scores here, by class. So you can see, you know, I've trAIned this on only 11 documents, nothing else, just 11 documents. And so what's happening here, it's already managing to learn the really dense type of data inside those tables, we need some more documents to be able to pick up some of the sparser ones, this is volume over here of tokens in the right to support. So through these are the tools that we use to fight these problems, over literally years, until we kind of lock into the right technology. And we've put that technology into the back end data science library we have. And that's what was released a few months ago. And now we've got this self service user interface that sits on top of it. So you can, we've got models, you can deploy into a pipeline, sorry, when it's all sAId and done. And that's the important part here is that it scales. And so that we take in documents, whether it's a PDF, or an image, a PDF is interesting to think about, because that can be a multi page PDF, so we're gonna get one document with multiple pages. But the JSON supports all of that and shows you the boxes of what we label when we're doing prediction. So we can use one of the two different models,
different post post processing that we've picked up, too, we label everything's and tokens, putting those together doing tables, line items, things that we're learning about as we talk with the different customers, all packaged into one pipeline that executes from top to bottom, in a scalable asynchronous REST API.
Model Validation
But it's a new user interface we're launching this month, and pretty excited about that. And you'll see more content coming out from us on this.
Yeah, so this is like a lock status is pretty exciting. We launched this last quarter, and we've had phenomenal traction. And, more importantly, we are able to tackle a wide range of use cases that we didn't have before. So it's a great opportunity for us to understand, can help solve some of your problems. So definitely, it's a lot of intimate interaction on the chat. But please reach us reach out to us, and how we can help you solve your intention documenting these cases, what types of documents. Our solution is extremely flexible, to be able to tackle problems that are typically not answered by a lot of the out of the box solutions that we're going to bring, go to the next topic. So far, what we looked at is a whole bunch of AI engines and tools to make your AI model. So we'll be AutoML from Driverless AI or H2O Open Source, Document AI and hydrogels, they're all helping us take a wide variety of use cases, different types of problem type, and for building models. But the second part of the equation is once you build these models, you need to then start understanding those results. Independence values validate those models when deployed. So talk about more focus a little bit about what do you do after you build those models? To start off, I'm going to invite Dimitri Gaudium. AgAIn, to talk about model validation, which is a set of capabilities that we have been building to help data scientists understand if the models are actually good, robust and actually validate them.
So model validation is definitely a new topic to our tool set, I would say, but we're constantly working on it. And we reached the point where we have some sort of a beta version of a product, I would like to talk about it today. We're going to be working on it, improving it and extending it quite a lot in the upcoming future. And I think we'll be AIming at launching it largely later this year.
So model validation is concerning pretty much any machine learning model. And I would, I would point out like four different areas of model validation we were trying to focus on, and why we believe more validation is an important topic. First of all, assessing the models, where I'm coming from is the financial services industry. And I'm a past experience, we had a lot of pressure from regulators with regards to assessing them. And validating models we use from all sorts of points of view. So what we were expected to do not only was not only to assess how accurate the model is, but also to take, take a look at it from multiple angles, such things as robustness of the models, what are the clusters of data where the model is having difficulties predicting correctly, or things such as how accuracy is stable over time, because we're collecting data over time. And there are certAIn trends in the population which change over time.
If the model has some assumptions behind it, whether they hold and many more, basically imposed by the regulators. But even outside of the financial industry, it is still a very, very important topic to keep in mind when you're developing a machine learning model. And you're planning to apply it to your business use case, what to expect in terms of the performance of the model in the future. And what are the inputs that would allow you to assess that more precisely, because looking at accuracy alone might be misleading, or might be insufficient. And as soon as you put your model into production, then you might face lots of different problems. So as soon as you focus on assessing the model, from a holistic point of view, the topic of validating or ensuring the model is fit for the production your use is brought up. So typically in larger companies are independent teams who do that. So based on the assessment of the model, they put a stamp on whether the model is validated, or whether it's not validated for production use to have kind of a final decision in the process before the model is rolled out.
During the validation and assessment the selection process happens quite a lot. Because model validation can be frequently an iterative process. So we built a model, and we see that it can, it has a potential for certAIn issues in the future, like some of the key variables are really unstable, or they bring some instability over time. And we expect kind of the future customers to have a little bit of a different profile. So that might lead to iterations of retraining models, changing the variables, including new ones or dropping existing ones. That brings us to a set of models we have on the table to decide which one would go to production. And validating it from the point of view of assessing. Each of them makes this selection more transparent. So instead of choosing just the best model, based on the accuracy, we're going to be using all important validation metrics here, we're talking about robustness, we're talking about complexity of the most or anything else that is important for for the use case for the industry and for for the company dealing with machine learning models. And last but not least, is customization.
A model validation is not, should not be just the black box where you put your model into and we get a reply whether it's a valid model or not. It has to be very much customizable, depending on the type of the use cases you're solving. So say time series problems, they require a different approach than just the typical tabular problems. If we're looking at deep learning models, then a completely different set of techniques are required, not to mention potentially regulatory industries where, where there are regulations in terms of what to look at, which tests to run, and what metrics to look at, are imposed by the regulators.
Having that said, let me switch to the product we have on a Cloud, which is dedicated to cover all these four areas. I would stress before switching to them on the customization part. So I'll be showing a couple of validation tests we have there. But kind of the key stress here is that the way we build a tool, it's highly flexible in terms of adding or adding new things there or changing the existing ones. So we maintain a so-called recipe structure in the tool. So you can bring your own recipe of a validation test or validation metric, and extend the functionality of the tool.
So let me jump and show you a couple of examples. So this is kind of a short demo, where we have just a couple of experiments where we built and we ran a couple of validation tests for them, just just as a showcase. First one is a Rossmann sale. I think it was a Kaggle competition back in the days, it was a prediction of a time series of sales across shops. So we start the validation process from looking at the model as it is, this model is coming from a driverless car. So you see a lot of typical driverless car data over here, we're just copying it over just to have it in the same place where we'll have validation metrics. And what we typically look at is test scores. This is our MSE. So how well that model performs on the test data, which is in this example, typically more recent data sample, as, as as often we do for time series analysis. And this is usually the number we use just to pick the model and what is the best model. But from a model validation point of view, there are many other things we should probably take into account, starting with looking at the cross validation score, and the difference between the two. And another one, which we rarely look at is training score. So how far actually the training RMSE is from cross validation, or from test RMSE. And that can already drive certAIn conclusions like how much test accuracy, are we ready to give up to have a model which has high which has closer training accuracy, so which is kind of less overfitting on the training data? Or how what would be the trade off for us between the model complexity, say in terms of number of features used or seen in terms of the depth of the model we're building and the test accuracy, or we're writing to sacrifice a little bit of a test accuracy, but to use a simpler model for the sake of it being robust in the future, or for the sake of needing less data to get collected to get applied? These are the basic questions we can start with when talking about model validation. But of course, we go deeper into detAIls. A very common and well known technique is to assess the stability of the accuracy of the model is back testing, where we would like to see how this accuracy would have evolved over time, if we would have had
this exercise of building the model a month ago or two months ago, five months ago. So how the accuracy of the model actually evolves over time, if we look into the past. And if we do so that can give us approximately the idea of how this accuracy would extrapolate over time in the future. And for this particular model, we actually see, on one hand, relatively stable performance over time, but with a few spikes, including the most recent time and here, investigation usually starts what causes these spikes, are there certAIn data regularities or certAIn periods of time, which are not really representative and maybe we should drop them? Maybe this spike was caused by say holiday season this point in time and
We have higher sales than usual. So let's have a look at the distribution of the sales values of the target file variable distribution. Were there any changes in variable importance when we're doing back testing? Or are we consistently saying that this feature and that feature are the most important for the model? These types of the analysis, one can perform to assess how robust the model is. But of course, it's just one of many examples.
When we look deeper, we are probably interested in predictors as well, how the distribution of a predictor is changing over time, for instance, what is the drift of the features over time? Are there any features which shift quite a lot, we see one of the top features shifting over drifting over time quite a lot is holidays, which makes sense probably, it's not worth excluding. But maybe there are some predictors we collected over time, which changed the pipeline of collecting it or definition of collecting it. And therefore, they're inconsistent over time, a drift detection would capture that. And we will make a decision, we'll say dropping it, or maybe using a correlated feature instead of this one for the model to make it more robust in the future.
We have few other validation tests, here in the tool, but we're focusing on rather building more functionality around that, because bringing more techniques here will be driven by concrete use cases, and will be implemented in a matter of bringing test recipes into tools. So it's going to be quite an easy test.
So these are just four examples of the validation tests we have for demo purposes.
Let me also show you another one. Yeah, let's go back to Rossmann sales. One more test, which you can be interested in is how different our test data is for training data. It's quite important for time series tasks, because we're not sure if the population changes over time dramatically enough for the model to get invalid already a few months after we deploy that. So instead of looking at individual values, variables drift, we also have a test which, which has a single, which gives us a single number, which indicates how different trAIn and test data sets are. And this particular test requires building actually models. So we're in the background, we're spinning up a driver, a CI server to put together training and test data sets and build the model that will try to distinguish one from another. And the accuracy of that model can be a good indicator of how different the datasets are. We can analyze this model to get to the conclusions, which are the features which had dramatic change, and then investigate what was the reason for it. Or we can have it as an indicator of distribution changes over the entire population over time. Moreover, we have the functionality to compare multiple runs and have the same test, sorry, wrong button, multiple runs of the same test automatically. And this way, you can even monitor how your population changes over time in terms of this statistic, and see how the model you've already deployed to the production can be influenced by the population drifting over time.
More functionality we have here, of course, includes comparing the models overall. So as I mentioned in the beginning, when might be interesting, interested in running multiple versions of different models with different input features or different modeling techniques, or maybe even using different tools. And eventually, we would like also to include multiple supportive multiple model training tools here. So user will be able to compare Driverless AI model to an H2O-3 model and maybe potentially third party model by not only looking at the test and validation accuracy, but also all the tests all the validation tests, including back testing drifts, similarity of the data sets and other tests your use case will require.
Let me stop at this point. Thank you for your attention. And please feel free to ask any questions in the chat. and I will pass it back.
Thank you, Jimmy. See that motivation is a big part of our AI. The key. The key is a lot of models talked about earlier, which is really part of the nature of the model are actually helping are effective.
And they are actually doing what they're supposed to do. So all the tools that we talked about, like back testing and research, I think those are critical for making sure that your models are actually ready to go to production. So once you're ready to go to production, what do you do it. So that's where machining operations comes into play. So we have a full suite of capabilities on Emma labs, taking your model all the way from model management model registry to deployment monitoring. So introduce object modeling here to come and talk about our time lapse offering job shake.
H2O MLOps
As I'm sure many of you are aware, H2O MLOps is one of the most open and interoperable MLOps platforms across the market. We allow our customers to use our product to manage their models at scale. Having hundreds, even 1000s, of different experiments that are being managed within our platform, we have some of the most simple deployment options and some of the most comprehensive deployment options that our customers trust us with. And we also have our customers using our product for modern monitoring, which is when the models are actually in production, how do you make sure that those models are performing well in terms of accuracy, drift, fAIrness, and bias. So considering all those different items, we are effectively looking at making our product MLOps, more and more open and more and more interoperable, because that's how we believe we are able to democratize AI for all organizations. So having said that, let's jump into our MLOps segment. We'll go over some of the new features that we have released very recently, then I'll be happy to show you a demo of each of those features. And then we'll end off with talking about what's new in MLS.
First feature I want to talk about is our support for third party motto management. As I was saying in the introduction, MLOps is striving to become the most open and interoperable platform for MLOps in the market. And part of that is being able to allow our customers to choose where they want to use any particular modules of MLOps, and use the tools that are really familiar for them.
And today, we are starting our support for third party management platforms, where our customers will be able to store their models on any of the model management platforms that are available, while still being able to deploy their models, show them labs and monitor their models with a show MLS. This really enables our customers to get more flexibility and openness within their overall ecosystem. And they're not restricted to any particular tooling that they are not familiar with or don't want to necessarily move forward. So ACOs MLOps really integrate well with other platforms. And modern management is really the first way for them to do that. And today, we are introducing our support for ML flow as a model registry. And I will jump into a demo to quickly show that.
What we've got is an experiment for wine quality prediction within an ML flow registry notebook right here. So what I'll do is just quickly run this as an experiment such that this generates an experiment within our oval area.
When this experiment actually finishes, we will see that experiment over here within our wine quality list. Oh, there you go. It's finished already. So that Herrmann is now listed right here. The cycle learn model that I just trained in a typical data science workflow, what we'd want to do after an experiment has been trained and is ready is actually go in on this and register this experiment as a deployable artifact that can then move forward into an actual deployment.
So from here, what I'm going to do is a registered experiment in our model registry, and also model registry and create a new model called product day test.
And with that, we're just going to explore, register this experiment as a model. And that's completed over here. So at this point, effectively, what we expect our customers to do is finish just a finish off their workflows within ML flow. And then, at this point, what they will do is hop into ACOs MLOps, which can be accessed through the app store, right here as a show MLOps. And they will enter this interface. And this is a main center of the MLOps interface. And for those that are not familiar with it, there's a ton of capability over here to manage their experiments, our own model registry and all the deployments.
So at this point, what I'm going to do is click on Add an experiment, since we have registered an ML flow. A psycho learn experiment with an M, also, I have a button right here for browsing of the ML flow directory.
And I can see that the experiment that I had just registered, the product day test, shows up in my list right here. So I can easily click to get the version number over here, conversion, and within a few seconds, that should be imported right here.
Then within my experiments list, I can see all the experiments that have been added over here from our model registry that is in a Moslem, and the same amount of metadata that you kind of expect it coming out right out of ML flow, you can view that right here as well. So within the parameters section, Parameters tab, you can see the actual target column. And additional metadata that is associated with the experiment is brought in over here.
So at this point, what I want to do is go ahead and take this and register this as a model. And with a model right here, we can then go ahead with the deployment. From the deployments tab, what I'm going to do is create a new deployment for product day test once again.
That's slick, a couple of configuration details. So the experiment that I have just brought in, it's all here, I want to deploy this into my dev environment. And just got two more configuration details. And just like that, I'm going to be able to create a deployment and deployment that was brought in, or sorry, an experiment that was brought in from ML flow, I was able to browse using the H2O MLOps UI, and within a few seconds, be able to create a deployment using Azure and within 10 seconds or so that the product day test should be up and running. But in absence of that, I'm just going to show you what the final product will actually look like. So if I click on the actual deployment details, I'll be able to see the actual state of it, the deployment endpoint URL, which will be used to score on that particular model, and a sample requests that I can just take this and use it as a curl request, and send the data into so I can see my model actually predict in production.
And that's really how easy we make it for you to be able to bring your models from ML flow into ACOs MLOps, and deploy that with just a few clicks of a button. And the model that I had deployed just now, that is now available as well and healthy, and it's got its own URL.
That's the first feature that I really want to talk about was the third party Model Manager support. Moving forward, we'll be supporting other platforms as well, it really just kind of started off with ML flows in the model registry.
And that leads us to the next one. The next feature I want to talk about today is admin analytics. So this is an incredible feature for some of our customers that are small to start, mid to large organizations that have a large number of data scientists working in particular teams. And what this tool really allows customers to do is be able to get an organization wide view on the overall adoption of machine learning at their company. So users with the right level of permissions, they'd be able to view this particular application and get an idea on experiments. So how many experiments are actually coming in or being developed at their organization, they'll be able to see based off of projects as well, how many projects exist within your overall organization, and count of how many deployments exist within each of the projects? How many models have been registered within each one of them? And then you'd also be able to see at a user level as well - how many are which users actually bringing in? How many experiments? And those experiments? How are they actually moving down the overall lifecycle? And how are they getting deployed into production?
So having said that, we're gonna hop into my other tab that really shows you details on the admin analytics feature. So within the app store, what I'm going to search for is analytics and you'd be able to see this app right here. And once you open that, what you're going to do is end up on this particular UI and this particular interface. And within this right off the bat, what you can see is on the dashboard view, we see all of the experiments that have been generated by the H2O team are within our company. So we can see a total of 162 experiments within this environment. 64 have been registered as particular model versions 68 are actually deployed, in two particular deployments. And that same number for deployment of model versus and total deployments. So this is an incredible amount of information that we're enabling for our admin users. So they can see how many experiments are actually brought in. And how are these experiments actually moving along into deployments.
What I'll do is I'll just quickly show you. So just sorting based on the environment. This allows me to see what has been deployed, I'm just going to click on this experiment that has been deployed to the dev environment. Details of this actually shown here as well, we can see that this particular deployment has been scored about 20 times, it's in our internal environments, so that's not too large. But by clicking on this particular deployment as well, what you're able to see is all of the values that kind of went in and what the prediction score was for that particular deployment. So you're really able to dive in deeper on, on any particular deployment, get the scoring details that have been created for them, and see everything at a macro level as well for a particular experiment in its deployment, and then deployment to actual scoring data.
So that's a dashboard level view that gives you that information. The next thing I want to show is our project level view. And this view shows all the different projects that have been created, along with who's the owner of them and a summary of what really exists within these projects. So sorting on some of these, I can see that a test three project was created, there are 14 experiments in them. And there haven't been any deployments created from that particular project. So a little disappointed to see as an admin user, that's okay. But I want to see deployments as well. So going off of sorting or sorting on deployments, I'm able to see that this titanic project within our organization has actually seven deployments. And that's great.
So I'm able to get that level of information for our projects as well, and really see which project is succeeding, how many experiments are actually in them, how many have been registered as modern versions, and how many of them are actually getting deployed.
So this gives our admin users more insights so they can take further analytics purposes, or for them to take any kind of action on their side. Whether it's to remind other data science teams to actually promote their experiments into deployments or looking at why it is that experiments are being generated, but not actually being deployed.
And the third view that I want to talk about and the final view I'm gonna talk about is the users view. And over here, any user that hasn't been onboarded to the MLOps platform would be listed here within your organization. And over here, we can see all the folks that are already over here. The first one just kind of looks at it sorting by the owner alphabetically, how many projects I've actually owned, how many experiments I've got, and the overall lifecycle of those projects. So I just want to see from the H2O organization, who has contributed to experiments that have actually been deployed in production. So I'm sorting by deployed to prod. And I can see that some of our data science team members are the ones that are actually adding experiments and deploying them into the production environment, which is a good insight for me to have.
And this is really a powerful tool that we allow our customers to use, such that they can get the insights that they need across your organization. Admins can really see the adoption of machine learning within their companies and organizations.
So with that, that's really a quick overview of issues.
Admin analytics. If you have questions about either of the two functionalities within MLOps, happy to answer them within chat. And now what I want to do is quickly dive into what are some of the more exciting things coming out in issues MLOps. So the first feature that we're looking to add is experiment tracking. Experiment tracking is a capability that allows our data scientists to track a lot of the relevant metrics and artifacts automatically, irrespective of where the experiments actually trained. And this allows us to capture a much richer metadata for your experiment, capture that and use that, within the overall H2O AI Cloud, to enrich the experience that we provide. By having more details about the overall experiment that was created.
Our customers would be able to use that to visualize the results for experiment tracking details. Or you can pull that data raw from there directly, and be able to use that for whatever purpose it is on your side. So it's very much tracking a future that we're super excited about. And looking forward to getting that into the hands of our users.
The next one is and it has a way to monitor your models. So our customers already have the capability of seeing their deployed models in production, and being able to monitor those. What we're going to be enabling with this is a single and seaMLess interface that allows you to go from management to deployment and monitoring or model and adding some more capabilities around future important explainability. And operational infrastructure metrics, along with the drift and accuracy that we provide right now.
That's really going to make modern monitoring a powerful area for not only the data science teams, but also the machine learning engineering, and DevOps teams that are managing infrastructure for deployments.
And the last feature that I want to talk about, that's coming up soon to issue is being able to monitor any third party deployments. So once again, as part of the open and interoperable mess of issues and lots, we want to allow our customers to be able to deploy their models anywhere that they want. If it's on the H2O infrastructure, great. If it's not, that's perfectly fine as well. And obviously, with the enhanced monitoring capabilities that we're going to be adding in, customers want to use our monitoring platform to monitor their models, irrespective of where they've been deployed. So third party deployment monitoring will really allow our customers to deploy the models anywhere, and bring the monitoring capabilities back into ACOs MLOps.
So that's really a very quick overview and highlight of what we're looking at bringing into a show MLOps very soon. And if there is any feedback or any comments on any of these, please feel free to add them into chat. And we'll answer that there.
H2O Wave
This is part of our entire ecosystem of helping customers wherever they are, whatever environment using whatever modeling frameworks they use. So be able to deploy and manage your entire AI infrastructure. We got to the make and operate parts, let's get to “how do we innovate”, right? You build those models and build these experiments, but how do consumers or more importantly business users consume them? For that the introduced daffodil, a local rapper double framework college will be which has been extremely popular among data scientists and developers who are building a lot of really cool applications out of this. So I'm going to bring back Michelle Tanco here to talk about what are the new innovations in H2O Wave. And then we'll talk about the AppStore itself. So some of these applications that we are building and customers are building are in the AppStore. We'll talk about innovations that are everywhere.
Again, I'm Phil Panko, and I'll be talking to you about our first app development framework. Wave is a tech stack that allows you as a data scientist, or someone who only knows Python, and maybe isn't a full stack developer. It allows you to build real time interactive web apps or dashboards using only Python. So this is for data scientists or other users who have built models. They have information they want to share with business users, like they want to build an interface that a business user can use. Everything is done in Python. So you have access to pre-built cards and components for building your own app in your own company's theme, and so forth. And everything is done in Python.
We have features here for real time sync. So everyone can get live updates at the same time. It is interactive. So you can look at several widgets today where you can click a button and you have menus and so forth. Users can collaborate in the app. So you can very easily build multi-user applications where users don't step on each other's toes, but they're able to iterate and integrate together in a single app.
And we also allow you to develop and deploy quickly. So we'll look at examples of that today.
So what is new with a H2O Wave? Well, the first two items I'm going to show you a demo of and talk about is for anyone who has used Wave previously, you'll know that this setup on your local machine took several steps to get started. And now this is all done with a single step, you install the Python library you need. And then when you run your apps, you automatically get your content server and everything that you need to get started. So I'm going to show you how that works. But first, I want to mention the IDE hints for PI charm. They're released today, VS code is coming soon. But essentially, we're going to have access to templates. Starter apps directly in our IDE will have snippets for a Wave cards and components. So we can build things really easily. And then we also get autocomplete on all of our Waves specific code, like user dictionaries or objects. So it makes the process of writing apps and getting started a lot faster. So let's go ahead and show how that works.
I'm going to jump into PI charm, here is an IDE for using Python, you can use your favorite IDE. Or maybe you just like writing it in if you're really cool. But anyway, so you have a brand new part, a brand new project. And I do have a Python environment, but I don't have anything installed in it. So the first thing I'm going to do, this is a little bit more for my technical folks. But I'm going to install the HOA package into my Python environment.
Alright, and it's going to go and pull this library and install it for me. If I check here then, we'll see that my Wave server was automatically installed. So now all I have to do to get started with wave is right click, I'm going to create a new file, I'm going to call it app.pi.
And I have an empty file here. And now we need app code to run. So I mentioned the snippets are having code hints and Code Complete directly from your IDE. So I'm going to type W and I get access to a lot of different things. The first one that I might regularly do for new projects is an app. So this is sort of the skeleton, the simplest skeleton for a common Wave application. And then I just have to fill out any code that I might want here. But I'm going to actually do a different template, I'm going to do the app header. And this is a standard application that has a header at the top of the body in the center light and dark mode, that then isn't developer, I can go at my own content too. So we'll see what this looks like. I'm going to come back down to my terminal, and I'm going to run this application, I'm going to go into my virtual environment. And I'm going to use the command wave run app.pi.
This will automatically start the Wave server for me and start the applications. And now when I go to my browser, on my local machine, I go to localhost 1011. And this is the sample application that came with the wave snippets, you'll see I have a nice header part at the top, I have a content that takes up my whole page and a footer. And if I wanted, you can see a little bit of the interactivity, we have a light and dark mode, for example. So then, as a developer, I can go ahead and update this template with some of the actual content that I want to show my end users, maybe I'm connecting to a model. Maybe I'm exploring a data set that was in my Drive, or whatever else.
Some of the other snippets that are available. We talked about how this is an example app. But we also have for all of our components and cards, more information, let's say that I want to have a new card. And I know that I want it to be a plot card. I want to show some sort of bar chart or line plot or something. I can type W plus. And then I have access here to either the plot card basic minimum, this is like everything that I need to make a plot work and you'll see that it's a location, a title and some data. Or I can use the W plot in full. And this gives me access to everything that's possible as a command or as a parameter. So if I'm using a new component or card for the first time, I love this feature for seeing everything that's available really easily. And you get all the options.
In addition, for anyone who maybe has used Wave before, we have the idea of the interactivity. So for example, when I was in this application, and I clicked that I wanted to go to dark mode, my server code was called. And then I had written code in the template that said what to do. So one of the things that we have with snippets available for Wave now as well is anytime you try to access those parameters, or those interactivity options, the snippets know about it. So if I try to look in my query arguments I have a list of, there's only one interactive object here. And it's called Change theme. But if I'm building a really complex app that has like 50, different buttons, and I have to remember all the names of them, it can be complicated. So snippets make this even easier, you get a drop down list, and you can pick the part of your code that you are trying to reference.
All right. One of the other things you're hearing on the Wave side is that when folks got started with Wave, they really enjoyed it, but the learning curve was a little tricky. And so part of the snippets install that I just showed you to make that process as easy as possible. We've also been working on new documentation to help everyone understand how you might want to be using Wave. So I'm going to go to the Wave docs at H2O.AI.
And I'm going to click on the Widgets option, which is brand new. And here there's an overview that gives you some information for getting started. But in the content area, I'll go to the header card. And here for you'll see lots of different widgets on the side, we have the most common ways of using these widgets, what they look like.
For example, what we've seen, the most common header card being is having a company logo at the top, and then a title and subtitle. But maybe instead of a company logo, you want to use an icon. Well, here's the code for that, where maybe you want your header bar to have navigation, you can click here and go to different places in your app. Here's the code for that. Even more, you can have some sample links at the top. And here's how you do that. So this is avAIlable for almost all of our widgets, you can go through and understand how do I use tags? What does the code like? What's common ways of using these components, and it's a nice way to get started or understand what's avAIlable for any application.
All right, the next thing I want to talk about is themes for our Wave apps. So we saw in our example app, I'm gonna go ahead and run the application again. We saw in the example apps that there was a dropdown where we could have light or dark mode. But we might want to have different things. Out of the box, there are several different themes available. And you can find these in the documentation. But instead of using the light theme as a default, maybe I want to use the actual, here's my snippets demo. It will show me the themes that are available. Let's do Ember, that sounds nice. So I'm going to update my code, go back to my app.
And I can see that this is in a new thing called Ember. So these things are available in the documentation, and you can understand them. But maybe you want to build your own theme with your company's colors and so forth. Well, we haven't asked for that. So inside the documentation, and in the Wave server, whenever you download it, there's an app called theme generator. So I'm going to go ahead and show you what that looks like. I'm going to use the Wave command, batch to download a bunch of examples available on my local machine. I don't have to go look at them in the documentation. And then I'll see here that now I have the folder called Wave. And in that there's a bunch of examples. So one of these examples is the theme generator app. You can see there's a lot of examples here. So I'm not going to run the app on my local machine because it has some imports I need to do first. But essentially, you have this available on your local machine if you want it. So I'm going to jump back into my app Cloud that we were looking at earlier, where this app is running. And I'll go ahead and visit it. And this is the app that you have available. So this is our tool for letting you build your own themes for Wave. So there are four different colors that you can customize. For example, I might want to make this in the H2O brand, which is that hex code. So now I can see the nice H2O Yellow. And what's really nice about this is it helps you. We're not all UX developers, maybe none of us are. It helps you understand if this is going to be easy for your end users. And where we are not.
So for example, we're getting a warning that maybe the yellow and the white don't really have enough contrast between them, my plot down here looks really great. But trying to read this button that says primary is a little bit tricky. So maybe this tells me that I want to change one of these colors. But let's say we built the theme. And we really like it. All we can do to use it in our app is we'll copy this. And we'll go back to our app code. And I'm going to say that the theme I want to use is H2O. But I'm going to actually add my theme here, and I just need to actually name it H2O, so it's usable.
Alright, and then I do need to run my app again. And we'll go back. Oh, I forgot a comma. This is how you know it's really a live demo. Okay, there we go. Now, our example apps in our nice new H2O theme. So the idea is you can make your apps feel and look like your company's brand really easily now. Alright, we'll go ahead and stop this app.
And, again, everything we've been looking at so far is already available in Wave. These are new features that have come out in the last couple of months. And the last thing I wanted to let you know about that's available today is we have some new app templates. So if you want to get started with apps, although in the snippets, there are some like sample layouts and common use cases, or their sample layouts, but in the app templates, we have common use cases. So I'm going to go to GitHub.
And I'm going to go to the open source Wave apps area where I have several example applications to help me get started. So we have some applications that are hard coded to a specific data set and give you an idea of what you can do with weight. And with machine learning. For example, the credit risk application is something that sits on top of a model that's already been built. And end users can review the predictions, look at the Shapley codes, which Megan talked about earlier, and then understand if they want to believe the machine learning model or overrule it with their business logic. So there's lots of different use cases here to understand what's sort of available. But what's new is we have a couple of templates.
What the templates are is not hard coded on a data set, they've been written so that they can work on more or less any data set. And all you have to do is update a configuration. So what do my single predictions from MLOps do? Well, I'm going to show you.
This application, let me just refresh, clean it all up. Okay, so this application, I have given it a deployment endpoint from MLS, you'll remember the objects showed us that just a little bit ago. And from that deployment template, this application is finding out exactly what fields the model has, and dynamically building an app that you can fill out to make predictions. So for example, I could say that the state of this person, I'm doing predictions for telco trends. So this end user is in Kansas, and they've been at my company for maybe 100 months. And I can make a new prediction. Right now it's 1409. And now you see it's 14, dot 20. So this is an example template. But we can go in here and we can edit the application, we can change the title to our specific use case.
And I could go to MLOps to look at any of my deployment endpoints. I'm going to just copy one from here. And you'll see my application, there it is. My application currently has state and account links, but I'm going to save this app. And now account length is at the top international plan, I've sort of changed the use case dynamically. So if this is a type of app that's interesting to you, you can use it today with no code. All you have to do is look at this template, go into the app, comma, which is our configuration file and change this information. You can change the theme you want to do, what your logo is, and then what your MLOps deployment is. We have a couple other templates. One is for exploring data, and one is for using the open source library.
PanDa's data frame describes understanding datasets more, but we hope that this helps you get started with building apps. Great. So now we're going to talk about what is coming soon with H2O Wave. So there's three items that will be helpful for our developers. We're gonna demo one of them today. So I'm gonna talk about the second two first.
We've had a lot of requests for being able to zoom in on tables and have automatic in activity there. So that's going to be coming. And then there's a component called toast notifications. If you're not a UI person, this might be new. But essentially, whenever you're on a website and a little notification pops up, it stays for a couple seconds and goes away, like a piece of toast. Maybe that's not why it's called that. But anyway, that component will be avAIlable.
The big component I'm going to demo for you today that sent a lot of requests, and I think maybe a couple of people will be excited about is server side tables. So today in H2O Wave, when we are using any of our components, we're sending all of the content from the server to the screen to be displayed. And in a lot of cases, that's really great. But let's say you're building models, and H2O-3, which is our distributed machine learning platform, you have millions of rows, and you want to be able to show some of them to your users, you do not want to send millions of rows onto the UI screen, that application is going to totally crash. So UI tables allow you to tell Wave, I want to build a table that has pagination, I want to do all my searching and filtering and everything else. In my back end service, I don't want Wave to try to do it on the front. So let me go ahead and show you how that works.
Alright, so here I have another application. I'm not going to talk too much about the app code today. But just know this is a template that when it's released, you'll have access to but we're going to focus more on what it looks like for our end users.
Okay, so in a Jupyter notebook, I went ahead, I am running an H2O cluster on my local machine. But maybe I should be running. Or maybe I could be running this cluster in the Cloud, like Megan showed you earlier. Maybe it's running in Hadoop. But I have an actual cluster. And I went ahead and just created a fake data set that's a million rows long, it has five columns. And some of them are categorical, and some of them are integers. So your data might be really big. But this is just sort of an example to show us how it works.
So in my application code, I am pointing to this H2O cluster. And I'm telling you about this H2O data frame. But the way back and the back end H2O cluster are completely separate from each other at this point.
Here, you can see on the screen, I have my Wave table, notice that I have 100 or I have a million rows, but I can only see 10 at any given time. And when I go ahead and click Next on the table, it gets me the next 10 rows. And so for each of these calls, it's actually talking to my back end database, well, not database, in this case, it's an H2O cluster, but it could be like a snowflake database or something else. And it's getting the rows that I need. Where this can be really nice is for searching, filtering and other things. So let's say I'm only interested in rows that contAIn some key phrase. And in this case, my key phrase is going to be 74. So we went down from a million rows to 29,000 rows, that in one of these columns has been number seven before.
So then my end user says okay, but I want to filter a little bit more, I only want rows where column C five has this specific value. Okay, you can see how quickly this filtering is happening. Now this filtering is happening so fast, because my H2O cluster Wave is not doing this work. This is sort of our integration piece. But the filtering on big data happens really quickly, I can search, I can sort my remaining 191 rows. And now I have the smallest and the top and the largest at the bottom. So if this is interesting to you, it will be avAIlable super soon. I think it's already nighttime so you can start using it. And we have examples. So if you want to specifically look at this H2O-3 example, we also have a panda's example, you can use that to get started.
Alright, so at this point, the last thing I want to share with you about which shore wave is the wave community. So Wave is completely open source. We've talked a lot about different products today that are proprietary to H2O. The wave is an open source platform, the source code is completely open, you can go look at it, you can make a PR. But here are some links that might be interesting to you. So screenshot them if you want the wave documentation, which has that nice new widget feature, but also explains to you how to get started, how to build your first app, what to do to get going. You can check out the source code if you want. Look at what's coming next. We have our roadmap there under milestones. If you have questions about WAIt, maybe you're trying to do something and it's not quite working how you want or maybe you have an idea for a new feature. from GitHub, we have a discussion panel. So you can go there, you can show off the cool new apps you're building. You can ask questions, you can talk to other community members, they'd love to see you there.
If you want some resources to learn more, I recommend the blog on the wave Doc's. So I will actually pitch this one a little bit. If you go to the blog, we have every release or every big feature. We have a detAIled blog that explains to you how to use all the new features and why they're exciting to you. And then there's also a blog called learning HTML wave and it has just a bunch of links and community resources and gives you a suggestion on how you might want to get started learning. So this is a nice place if you want to know more, but you're not really sure how to get started.
And then the last thing, we looked at the wave apps, repository and GitHub already, but it has a bunch of open source example apps and templates to help you get started using wave to build your own apps.
Alright, at this point, I'm going to hand it off to our next product team, and we're gonna talk about the H2O AppStore. So what we just did was talk about is the HCOS way of building applications. And this is more for our technical users or data scientists, folks that want to build apps themselves. But now we're going to pivot a little bit, go back into the AI Cloud UI. And we're going to talk about the AppStore.
H2O AI AppStore
The AppStore is a place for your developers to publish their applications, but also for your end users to browse applications, use apps, share apps, and so forth. So what is the AppStore?
It's your organization's home for AI apps. Some of these apps are avAIlable from H2O, and you've seen several of them today, like model validation, there's going to be another one later, AutoDoc will also allow your developers to build their own apps. So developers can build apps, using a stowaway for example, and upload into the AppStore to share with other company or other users as a company, your end users can browse the apps in the AppStore, look at what's avAIlable, see what's new, but they can also manage their instances. So a lot of the time maybe our admins, for example, really don't want apps running or no one's using them. So as an end user, I can go into my app instances on or turn them off, and so forth. And then the admins have control in the app store for who has access to what. So some apps might be particularly secure, and you only want a certAIn group of users to see them. All of that can be done using tags and roles. And if that's something you're interested in, let your H2O personnel and they can tell you more.
All right, what is new in the AppStore. So the first thing I want to talk to you about is managed versus on demand apps. And I'm going to close my waste tabs and switch to my app store tab. And let me tell you what managing on demand means. So when I'm in the AppStore, usually as an end user, or is that as a user of apps, what am I doing when I go to a specific app, is start my own instance of the app.
What an instance means is that the application is actually running. So think of the idea of having Microsoft Word on your computer versus having four Word documents open. Each of those Word documents is an instance of word running. So just looking at this app in the AppStore, this is the application and what I would have access to. But when I actually run the app, that's an instance of it running. So a lot of applications or a lot of developers might build apps such that each person runs their own instance. For example, I can see here that there are 11 instances of this app running that are public, there might be more instances that people are running privately because they don't want to share them. But these are 11 instances of the app running. And if the app is up or not, maybe I could go visit that I have an instance I have access to go run it or I can write my own. This is sort of our standard practice practice. For apps, we call this on demand. However, we have a new feature called Managed applications, which allows the developer of an app to say that they have actually built an application to be multi-user. And that there only has to be one instance of the app running. And all users can share it together without sort of stepping on each other's toes. So an example of that would be our model ops application. You'll notice here, if I click on App instances, I am not the owner of this instance, someone else's, and I have no option to run the app, I can only visit it. So this is really great for our end users. Because you save the step of having to create your own app instance, you can instantly click visit, you don't have to wAIt the 30 seconds or so for an app to start when you spin it up. But it's also really great for our admins, it saves resources. If you have an application that can be built using multi user, and you have 50 users using it that saves you 50 instances of resources. So each of these resources, maybe a quarter of an AI unit. So that can be really big savings. So this is probably most exciting for my admins. But you now have the ability to have managed apps as long as your developer builds the app to be multi user.
Alright, the next we'll talk about is aliases for apps. So I don't know if anyone noticed, but when I was looking at being a generator, for example, and I went and visited the application it became more confusing. Okay. I went and visited the applicant. I'm gonna click on my instances and visit a different application.
Okay, well, where I'm going with this is that when apps are running, there we go, you will notice that the top is not particularly attractive. So this is a unique ID or UID. And every application instance has its own unique ID. And in a lot of cases, this is totally fine. But there might be instances where you want a permanent address, say every time there's a new app instance, you don't want to have to in your back end processes, update the URL. Or you might want this to be more end user facing if it's a particularly important demo or application. So this is now available with a feature called add aliases. And to show you an example, I'm going to go to the H2O website. And I'm going to click on solutions. And here you can learn everything about what H2O does. But I'm going to specifically go to this hospital simulator. And this is going to redirect me to have some Google Analytics but to change stuff, like the H2O AI, so I'm not going to demo this app, Nicki's gonna talk about health care later. But essentially, you'll notice this is going to be a prettier URL, it's static. Anytime there's a new version of this app instance, the URL doesn't change it just automatically based on a little command line from my developer points to the appropriate instance. So this is really nice for anytime you want something a little bit more permanent, in, in an app you're building.
Alright, oh, and the last one is very little. And I wouldn't necessarily normally mention it, but several people have asked recently. So I'm gonna make sure you know about the latest names. So when I am looking at my apps in the AppStore, for example, text data labeling applications have versions. So whether there's a new feature or a bug fix, developers can update a new version of the app. And when you're in the AppStore page, when you click, it will always take you to the latest version. But here I have a drop down list. And I can see that this specific app has a lot of past versions that I might be interested in. But where I'm going with this is that the URL is again, a unique ID for each of these versions. But if you were to use this link, in some other process, like say, a confluence page of apps, you want to link to something, it needs to be updated, every time there's a new version, because the UU ID is directly linked to a specific version. So if you want a stable URL that will never ever change, there's this feature down here called the app URL, and you can copy this. And now that will always take you, um, you'll notice I'm on version zero 10, right now, that will always take you to the latest version. So that has redirected me to the latest version, which is 10, six. So for a couple of places, this can be really helpful, I wanted to mention it.
Alright, um, finally, I want to talk about what's coming soon in the H2O AI Cloud. And there's two main things here. The first is H2O marketplace. So this is going to be most exciting for my admins. So if you're the admin or owner of an HR Cloud, and you want to know more about this, please let your HR personnel know.
But the marketplace is basically an interaction between H2O and your Hybrid Cloud environment, so that you can easily get updates on apps. So let's say you have the MLOps app from us. And there's a new version of it via marketplace, admins will be able to see anytime there's new versions of apps, and they'll be able to see apps installed in their environment from H2O. And click a button to, in a lot of cases get either the install done for them, or a list of steps. Sometimes our apps have manual steps that need to be done. Like you have to configure your own S3 buckets for security, for example. But the install instructions are provided and so forth. Admins can also browse new Acts avAIlable from H2O. So we're always putting out new stuff. And the owners of the AppStore can see what's avAIlable and if they want to install it or not. So that's a feature that will be soon, again, most exciting for my admins.
The last thing I want to talk about is Jupiter labs from within the AI Cloud, specifically the AppStore. So today, earlier today, if you've been with us the whole time, we looked at the platform token which allows you to use all the API's from the iCloud from your local workstation. But there are times when you don't necessarily want to have to be on your local workstation. You want to be directly in your own environment. And this is where the Jupiter labs app can help us.
So I'm going to jump back to my Cloud. And I have this as a pinned app because it's one of my favorites. So I'll go ahead and view it. And here I actually have multiple instances. I actually want to show that way instead. So I'm gonna go to my instances, this is all the apps that are running that I specifically own. And I'm gonna specifically filter just to my Jupiter one. There we go. So you'll see here that I have three instances of this notebook. I know we haven't looked at it yet, we will in a minute. And two of them are public, which means anyone that goes to that Jupiter app, they can see my notebooks and they can go in and they can look at them. And I do this for sharing notebooks with people and collaborating, it's really helpful. But I also have a private instance, which is only me because these are things that I don't want other people to touch. So there's one of the nice features of the AI Cloud.
And with notebooks, specifically, you can have work you want to share and work that you don't want to share. So I'll go ahead and go to my Cloud. And this is an instance of Jupiter labs running with connections to our different API's. So for example, this is a notebook. This notebook is up, it's using the platform token that we talked about earlier, when it's a tutorial for connecting to Driverless AI. So it has the specific by default, it's going to use what's the what's the environment, I'm in every environment is going to have its own token URL at some client ID. But I'm running in this environment. And I can connect and I can load the driver list and so forth. This is a stand up for the lab. So if you're familiar with Jupiter, you can make notebooks, you can share links to notebooks with folks as long as your app instances avAIlable to them, and so forth. And we're really hoping that this helps our developers who maybe don't have access to Jupiter on their local machines, get started using the Cloud and interacting with all of our API's.
Alright, at this point, I'm going to hand it off to the next person to talk about our next product. But if you have any questions, please put them in the chat.
Thank you, Michelle, for the ones who demo. So just to reiterate, like what we and apstra bring a whole series of applications for technical users and also business users, right? Most of the thing is that income me, some of you might have noticed this, but we actually use Wave quite a bit ourselves internally. So a lot of the key generator apps and all that. Michelle mentioned that you probably notice emulators, which I've checked them earlier. They actually worked, like anywhere from simple apps, really sophisticated workflows, all to a store where it allows our customers to go from simple use cases, business, making use cases, actually sophisticated workflows all the way up. So do check it out. And I think all the tooling that Michelle demoed earlier, is going to make it even easier to get started. So if you have been like sort of on the fence or been trying to figure out how to better get better results and get that, but that, I'm going to hand it over to Chris Scylla cat, who's product manager on the team focusing on financial services, HDX, hardware, financial services and specific application so that we're going to talk specifically about protocol automatic documentation, which has been avAIlable in the H2O suite for a while. But today, there's a new update in the AI Cloud. And let's talk about why that's really interesting for financial services customers and also for other regulated industries. So over to you, Chris.
H2O AutoDoc
So today, I'll be talking to you all about our AutoDoc Wave app.
Like Vinod mentioned earlier in several regulated industries, there are regulatory requirements to have models as part of what's called model risk management. But outside of just regulated industries, it's generally best practice. And it's important for reproducibility concerns to be able to document how a modeling pipeline was constructed and how you ended up with the model that you're running with.
Our Wave app here uses Wave framework to provide this air and then it's also using our standalone out of that Python module as a back end piece to take telemetry that's recorded for our model as well as the template for the document and then renders that into either a markdown file or into a Word document they can download and also renders it in the app for you to look at which will show you in a bit. This kind of provides just a very standard and repeatable way to do supervised learning, model training and validation documentation. And currently, we're supporting H2O-3 of the open product as well as Driverless AI and we're announcing adding third party support for Python. You get a lot of efficiencies through templating and automation.
So what is it? I just sort of explained it a bit to just visually kind of see. And we will go through a proper demo shortly. Just to give you a general sense of some of the problems with documentation without an automation tool is that the modeler just has to capture all kinds of telemetry. What was the environment? What version of Python am I using? What version, which class, am I importing, and all those sorts of nuances, as well as the model metrics and the training and test and validation splits. And it's a lot to capture. And so what happens when you're using our Cloud is that you can capture these things in a more automated way. And then we will generate an automated document for you. And this just gives you greater accuracy and consistency. There'll be collaboration and just for, particularly for regulated customers, like in banks and insurance, having that sort of consistency, as well as automation is pretty critical to having a repeatable process, which is key to meeting new regulatory obligations.
So right now, we currently support models that come from a show three, these are modules that are getting imported in. We also support learning, classification and regression models all across them, and there's a listener documentation around specific ones. And then we have expanded support for Driverless AI. Certainly earlier, you would have seen Driverless AI had an AutoDocument inside of it that you will see in Python and to do within the app. You can also use the Wave app to access your Driverless instance to then extract and generate that auto back from your experience.
So let's take a real quick look at an example using learn. So this is the prostate cancer data from the UCI machine learning library. And this is just a very simple logistic regression model development cycle learning, I'm actually using the Jupiter lab in the Cloud that Michelle was into earlier.
And so if I want to document this model, once we run the model, you can go to our apps. And so you can look for it just by searching for AutoDoc. And here we are. And so I already have an instance running, so I'm not going to try to create another one, I'll walk you through the process real quickly before I kind of jump into one that's already been pre generated. So for record type, we're going to create a site pickle. And let's just call that scalar. You'll import your pickle. So go wherever you're storing your pickles. I prefer the Java format, but periodical format is also okay. And then also to do some of the telemetry you need to upload some of the data that you're using so that we can do performance metrics.
Now since in the sake of the workflow that I'm demoing here, I'm comparing several different outputs from Driverless from H2O-3 and from psychic learn, I'm not going to do the testing because I might have been planning to do out of time sampling separately.
And if you're interested, there's some advanced configurations in here. If we wanted to override any of the faults, you should know that's an option. And then you can create the AutoDoc. Now like I sAId, I've already generated one of these. So we'll just go ahead and this might actually render very quickly, so we can do it. We'll jump into the one that I already rendered. So this is the web UI that shows the audit doc format. So there's the experiment overview, data overview feature importance, final model, alternative models, partial dependency appendix. So these are the exact same things that you've seen in previous forms of the documents.
And then he has PDP plots and Shapley values. And then you can also open and download a copy of it as a Word document. And you do the same word document format contains the same artifact that we just saw in the web app. So that's a quick overview of what's there and we have detAIled documentation online.
We are adding more support for H2O-3, in particular for Steam managed instances in the Cloud. So that way, you're not just uploading modules. It'll give you some greater flexibility in terms of some features there, we'll be expanding our support for SAI kit, learning and adding additional modeling packages. We're thinking along the lines of stack mob and some of the frameworks, and then additional support for customization of the templates. If you're familiar with the Python engine that exists today, you can already do that as a markdown file as your template. And so we're just getting the front end on parity with what the end.
If you want to try all of these apps are available in the Cloud today. So you can go and check it out, go ahead and sign up for the free trial and then use it because in the future, you want to do a deep dive to reach out to one of us.
H2O Health
We're going to talk about shipping from financial services or work to healthcare. This is a vertical that's very near and dear. It was being part of the mission of the company to do AI for good. And we was invested over the years a lot into making sure that our platform can be used to help improve healthcare across different domains. So we look at all kinds of different health providers, payers, insurance companies, or companies.
And I want to choose Niki, who's our product manager for the healthcare vertical. And she will talk about some of our innovations and also our efforts to work with different sorts of players in this space. Thank you very much. Hello, hello, everyone. My name is Nikki. I'm very excited to be talking about the Race to UC Health Initiative.
In H2O, we have 10 years of healthcare experience and we think that we have actually worked with more than 70 healthcare organizations in 12 countries including North and South America, Europe and Asia. Within that experience of course, comes hundreds of healthcare problems that have been addressed with H2O capabilities. If you are interested, I'm not. For the interest of time, I'm not going to go into too much detail about our previous use cases. But if you are interested, I invite you to visit our healthcare page.
From our homepage, you can go to solutions health and scroll slightly down to our use case catalog with a very simple registration you can actually access the more than 100 the use cases I have been talking about and go directly to the app, but to the solution that perhaps you are interested in and find out more. You can also of course reach out to us and we can discuss more in detail.
I will talk about the solutions that we have actually worked into our thinking in our app store. So we move from ad hoc solutions through this experience we have been having with customers to actually create and reproducible and domain specific pipelines. Again, let me show the view to our app store that Michelle already introduced. If you have access to our public AppStore, please visit our health care plan here and explore the various solutions we have developed already in all fields of payer provider pharma and population health.
For this discussion right now, I'm going to be focusing on two solutions. One is the COVID-19 Hospital occupancy simulator. It's a mouthful, so we like to call it CHOS. And the gene mutation AI AI. Let's start with the COVID-19 Hospital occupancy simulator. Of course, everyone is very well aware of the pandemic that has been tormenting the drone over the last two years. And that we that we were actually caused to help health care providers to predict and prepare for the next COVID-19 wave. This app was prepared for a basic healthcare big healthcare organization in the US. And in essence what it does, it offers simulation based ICU and non ICU facility occupancy projections. We are integrating county level predictions of COVID-19 cases. And we consume facility specific historical data, or create appropriate geography appropriate estimates and these talks to the social determinants of health for those in the field. Of course, we also can integrate real world evidence in the app and in the simulation, and this can be public or proprietary. I'm going to switch to this specific app. This is also the solution that the app that helped the alias that Michelle demonstrated there, yes, so feel free to visit directly chos.cloud.h2o.ai and play around with it. We offer various explanations, both about the overview of the app and what it does, but also you see more about the algorithms and the simulation that I'm in the data that is running behind it. I'm going to go straight to the Simulation page, when you see that will have the ability in this version of the app that you see now to use public information about the historical hospital occupancy trends in specific counties here, as I've selected Massachusetts, in the Boston area. There’s a drop down all the states and all the counties in the US, I will direct you.
First of all, to the output of the app, which is in essence, with a dashed line, you see here, projections of occupancy in non ICU and ICU wards. And this can be very important in the decision about staffing, making beds avAIlable and anticipating the volume of patients with the next COVID-19 way.
The app is informed not only from the historical hospital information that you see here, actually, for this specific county. This is the average of that hospital’s statistics over the last four weeks. And this is what the app is consuming. But also we're consuming the model that offers forecasts about COVID-19. Here, we see that, of course COVID-19 is on the decline currently, but we still have quite a few cases since we might be interested to know what to expect.
Now, this is the average hospital in the county I have selected, perhaps your hospital or your region, somehow different characteristics. And we allow the user here to actually personalize the hospital, perhaps the nurse or or the staffing manager, and make it close to what we have observed over the last past week. Let's say in and in a specific hospital, perhaps the average admissions in the ICU were quite higher than the average.
And by applying go where they please focus in this plot that deals with ICU admission, so that you can see, we see that indeed, the numbers to be expected are much higher. And we do see a downward trend towards the end. And that's already informed. That's because it's informed as well by the actual COVID historical data and projections. Now if you and you can reset the defaults, if now you want to run what if scenarios about the future, for example, let's say I hope doesn't happen with that is another big wave of COVID cases,1000 per week, perhaps new cases, and perhaps the disease's more severe so who have a longer length of stay in the ICU again, please focus here.
And we can see that indeed the projection says and we anticipate indeed the increased volume of patients in the ICU. This up with some modifications. Of course using the hospital data is currently in use in one of the biggest hospital systems in the US. I want also to point out that for those interested to find out more please visit the IES as you see it here and also visit the documentation when you waste
Find a lot of detail about what and how you should use the app and also the algorithms that are running behind the second app. The second solution I want to talk about was a provider population health.
I want to talk a bit about the provider pharma solution, Gene Mutation AI. And this is in the suite of precision medicine applications that we are developing. So the application can consume the whole genome or gene panel. Next generation sequencing data evaluates the base into risk for disease that we are interested in, I'm going to be giving an example of triple negative breast cancer. It can seamlessly integrate different AI models in the analysis pipeline, for example, for different models for different subtypes of cancer, identify genes that influence patient risk, and are potential drug targets, which can be very, very interesting. And monitor model performance over consecutive cohorts to ensure that the app is working as expected.
You can find this app in our app store. I'm going to go straight here, we have a tab where we allow the user to quickly inspect the data, but also upload new data, either from a local, we also have a Snowflake integration. So we can connect directly to your Snowflake account and pull data that you already have put there. You also see here, this data tends to be very wide. Especially when we’re about whole genome sequencing data. With this toggle, you see a preprocessing pipeline, in this case, for dimensionality reduction. For this specific example, we are actually implementing no words about how things are grouped by pathways. And we'll have summarized the binary mutation data into pathways. Once you have imported with the data, we can go straight to the predictions, we'll have the selected data set, and we can select it may since we want to explore more, and then experiment and here is what I was mentioning that you have a drop down of all the models already trained.
And which can also be enriched, this library of models can be enriched by this upload button here, directly incorporating new modules, for example, for different cancer subtypes. But perhaps we want to examine as I press the button Show, but it's actually the predictions happening in real time you see the dashboard being populated. And what we first see is the binary classification for this space, and actually is expected to have high grade breast cancer. And we see here no more specifically their estimated release, which is 42.3%. What is very interesting, we can leverage the capabilities of femoral lives in abilities that our platform offers, and start digging deeper into what causes what drives this higher risk for the space. And to do that we're going to look into Shapley values, the local level globally for them refers to the entire cohort. And we'll see that the very well known ICK pathway actually is primarily but not exclusively, driving this higher risk for this patient. But it's not only that, we are also we are also offering assurances about the performance of the model over different cohorts in how confident can we be about this prediction in this case, by comparing the base into the cohort and it did we see it's one of the highest risk we observe. And also we offer an orthogonal method to understand how this space compares with other patients in the cohort and by finding the 20 more similar patients on the basis of the features. In this case, it's surprising because this patient actually looks more similar to low grade patients than to high grade. And we can understand with this radar. Why we why this might be the case. Because the low grade spaces have low mutations three
consists in all these pathways. We see however, the specific space and differentiate in the pathway of immune signaling and says higher mutation frequency there. We can move forward and actually run a what if analysis using the PBP and eyes, again, capabilities offered by your platform, and we can explore better in the context of the specific genetic background of the patient. What will happen, if with some magical region, with some magical way, we'll get the change in the mutation frequency for this specific pathway, I'm going to be activated physically, which refers to the population and we see with our eyes thought that indeed, an increased frequency given the exactly the same genetic background for the space in the gene, mutation frequency increases mutation frequency of the genes associated with immune signaling does confer an increased risk for the space and and perhaps there is nothing something more there to explore for this specific patient to understand the reasons for this predisposition. We are in the target discovery phase, perhaps we can use this information to further dig deeper and understand better the causes of this disease. Finally, I want to close with a disparate impact analysis, there has been a lot of talk about the avAIlability of genetic data from diverse populations, this continues to be a problem and we want to ensure that the model keeps performing as we expect as a data scientists who are training the model expect, despite for example, or the ethnic background of the patient, and will offer here the distance based disparate impact analysis to the does exactly that. And with that, that's all I had to share, please work. What's the space age to help and thank you very much.
H2O AI Feature Store Demo
Thank you, everybody for the opportunity to present in front of you today. I'll just reset us again on the demo with the Feature Store. What I was trying to show at the beginning was training a model with features from A to A Feature Store in Driverless AI. Just to provide that context. We're predicting flight delays due to weather disruptions. And we had a set of superheroes who are our personas to challah from Black Panther, who's a data engineer Aurora, aka storm from the X Men data scientist, Peter Quill, also known as Star Lord from Guardians of galaxy, and Scott Lang, Furman man who's the data scientist. So we went through and we connected to the Feature Store and registered and ingested the feature set, which is what the challenge did. But if we run all the way back to where we were when we left off, we had just done the join between the two feature sets, which Sutala did as the data engineer, and we're getting ready to ingest it into Driverless AI, which we did with a row. So a row is going to use those features to set up a build a model in Driverless AI. So we made the connection already.
While I was off the screen, I wouldn't complete the ingestion for the data from Feature Store into Driverless. And we went through and we can just kind of review real quick what the data is in here and you can just so you can see the DataFrame. So here's all the output for the columns. And I already have all the experiment variables setup for Driverless so to do is I'm going to go ahead and launch this experiment while while we're running the experiment where it's going to kick off in Driverless run it again.
Right so it kicks off in Driverless to actually do the split here real quick and do the prediction.
In this case, we're looking for the time delayed. If we're here while this experiment is running and go back through it, just talk about some of the setup inside of Feature Store. So, today, right now, I'm running a lot of these helper functions out of the notebook. But with the latest releases, Driverless, and with H2O Feature Store coming into the AI Cloud, all these functions will go away, because you can run it directly from Driverless or inside the Feature Store UI. But when we connected to Driverless I was able to set up all the variables for the Driverless experiment.
So here I'm selecting the flight, arrival delayed. And this is a simple classification experiment. So while it's running, see how long it takes if you have enough time, but where it runs, what happens is, we'll get the Mojo produced from it. And we'll extract it here. And we'll be able to reinvest directly into the Feature Store. But you can do this all straight from the notebook. And you can also view the features inside of H2O features for UI. So with that, I think the experiments are probably going to run a little bit longer than we want to. But just to show you that, you can use the data from features not only to do the feature transformation from raw data, we can also take those features that are from the Mojo and put them back into a Feature Store. And with that, I'll stop there so we can wrap up back over to you, Ben. Thanks.
So you saw a whole slew of stuff. I mean, it was supposed to stick to the circuit of the whole thing. Thank you for your patience, I really appreciate you guys. There's a lot of products, they all are available. The best way to get started is to sign up for a free 90-day trial and sign up for the Cloud account. It's all in there. And you should be able to play with it and give us feedback, as you try these different things. We have different places for you to connect with us.
And you'll be able to get feedback, I just want to point out one quick thing. As you're looking through all these different products, a quick way to know about what all things there are is a documentation page. So if you go to docs.h2o.ai, that's your starting point. All the different products we talked about, they're all here and your stuff as it comes in log here. So you have to go through and pick up the documentation for any of these products, see what's new, what's coming up. And then if you want to try it, go to h2o.ai/freetrial, so go try for free, sign up and you'll be able to get into our AI Cloud and then all the products that we talked about will be available for you to try.
So this is the first product day iteration for us. We learned a lot during this. We'd love to do more of these, as in every quarter. We hope to see you soon in person at one of our meetups or the next party, which hopefully will be live.
Thank you all for staying on and wish you all a great week.